Bonus guide: LNDg
LNDg is a lite GUI web interface to help you manually manage your node and automate operations such as rebalancing, fee adjustments and channel node opening.
Difficulty: Hard
Status: Tested v3
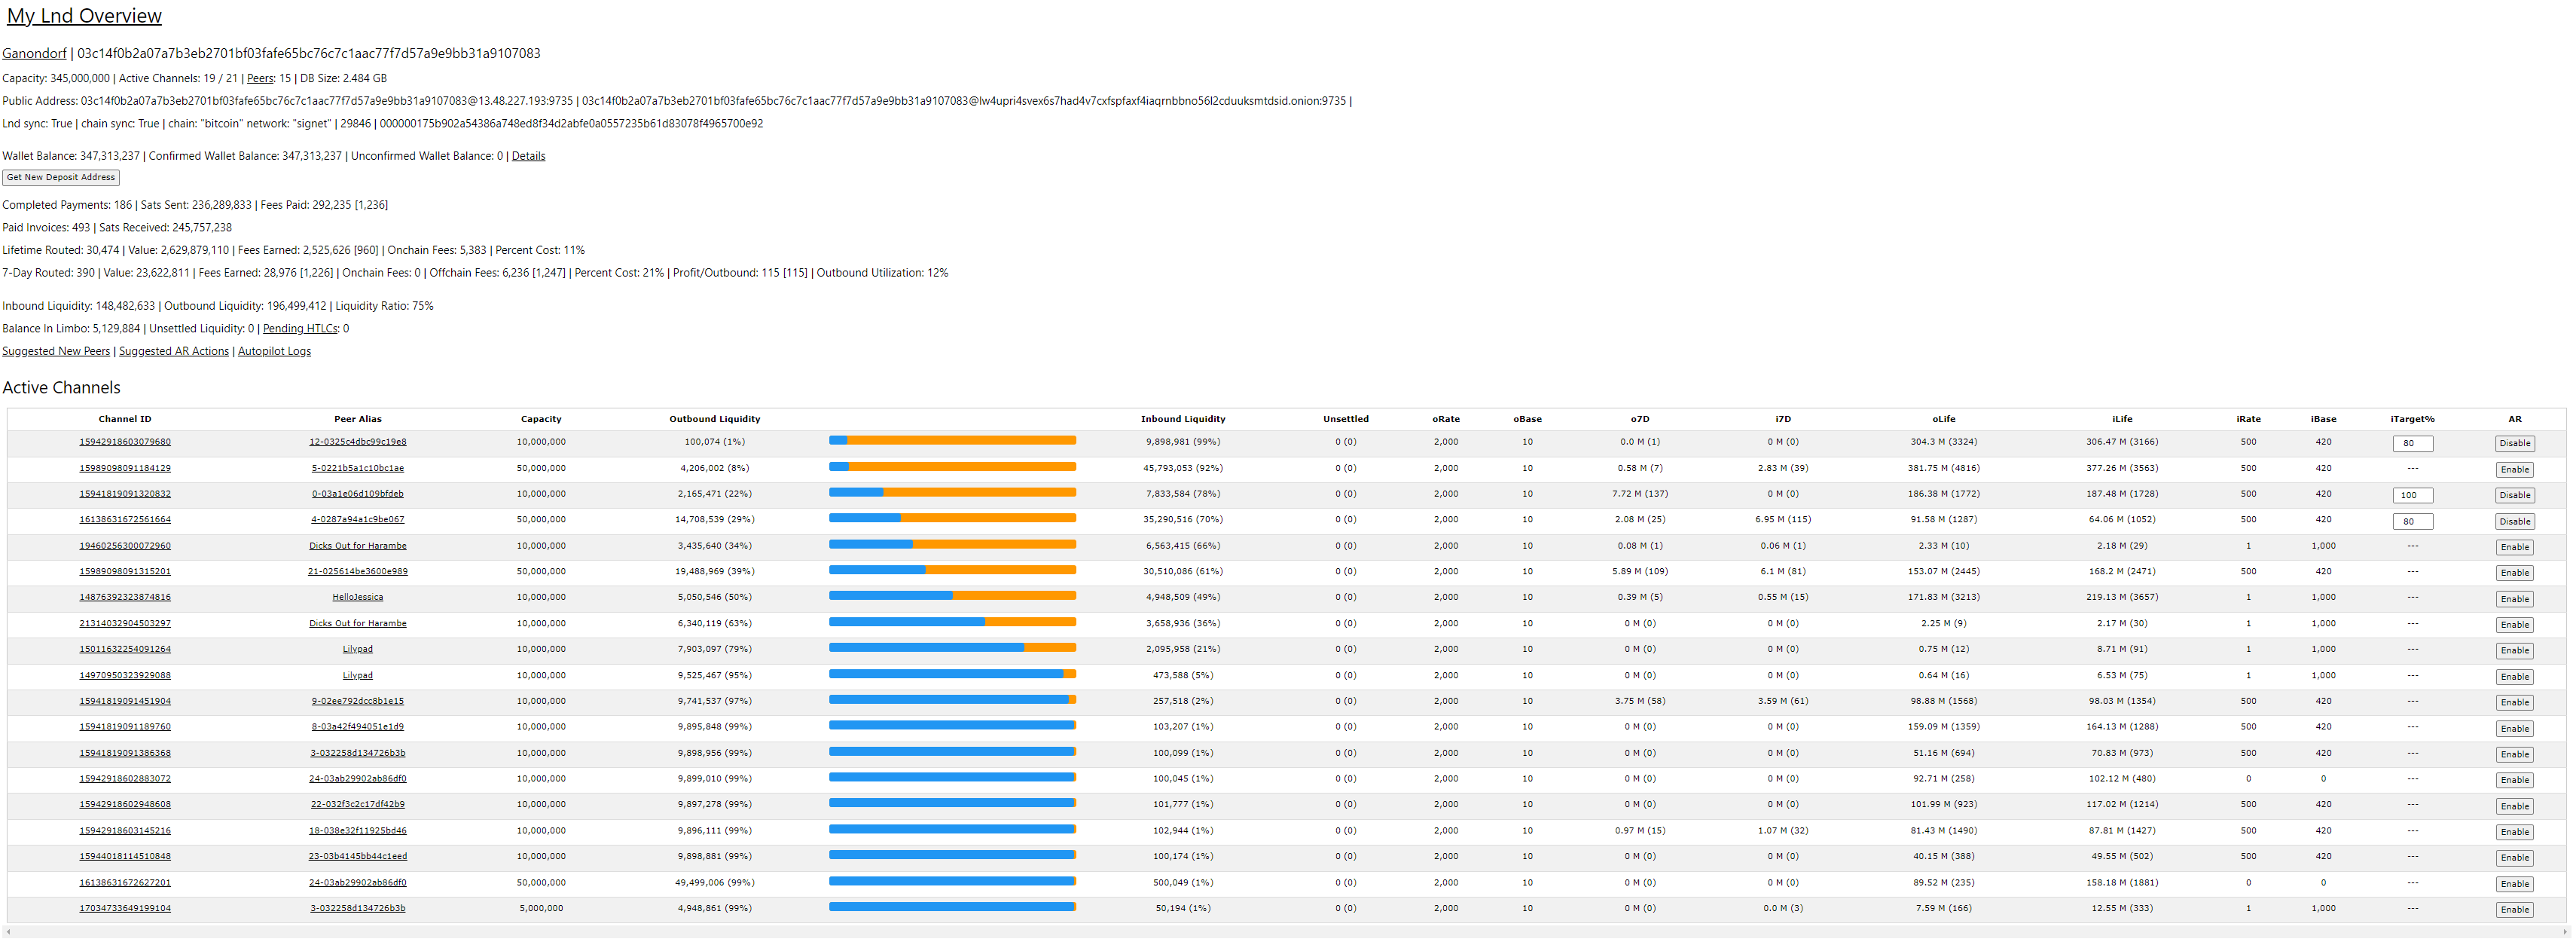
Table of contents
- Requirements
- Preparations
- LNDg
- Dashboard privacy configuration
- Remote access over Tor (optional)
- For the future: LNDg update
- Uninstall
Requirements
- LND
- virtualenv
- uwsgi
Preparations
Python virtual environment
Virtualenv is a tool to create isolated Python environments.
-
With user “admin”, check if
virtualenvis already installed on your node. If not, useaptto install it.$ virtualenv --version > -bash: virtualenv: command not found $ sudo apt update $ sudo apt install virtualenv
Firewall
-
Configure firewall to allow incoming HTTP requests:
$ sudo ufw allow 8889/tcp comment 'allow LNDg SSL'
$ sudo ufw status
LNDg
Installation
We do not want to run LNDg alongside bitcoind and lnd because of security reasons. For that we will create a separate user and we will be running the code as the new user.
-
Create a new user and make it a member of the “lnd” group to give it read access to the LND macaroons and data
$ sudo adduser --disabled-password --gecos "" lndg $ sudo adduser lndg lnd $ sudo adduser lndg www-data $ sudo adduser www-data lndg -
Log in with the lndg user and create a symbolic link to the LND data directory
$ sudo su - lndg $ ln -s /data/lnd /home/lndg/.lnd -
Check the version number of the latest LNDg release (you can also confirm with the release page) and clone it.
$ LATEST_RELEASE=$(wget -qO- https://api.github.com/repos/cryptosharks131/lndg/releases/latest | grep -oP '"tag_name":\s*"\K([^"]+)') $ echo $LATEST_RELEASE > v1.7.1 $ git clone --branch $LATEST_RELEASE https://github.com/cryptosharks131/lndg.git $ cd lndg -
Setup a Python virtual environment
$ virtualenv -p python .venv -
Install required dependencies and initialize some settings for your Django site. A first time password will be output, save it somewhere safe (e.g., your password manager).
$ .venv/bin/pip install whitenoise $ .venv/bin/pip install -r requirements.txt $ .venv/bin/python initialize.py -wn [...] > FIRST TIME LOGIN PASSWORD:abc...123\ -
Generate some initial node data for your dashboard. If you get an error message, try running it again.
$ .venv/bin/python jobs.py
First start
-
Still with the “lndg” user, start the server
$ cd ~/lndg $ .venv/bin/python manage.py runserver 0.0.0.0:8889 > [...] > Starting development server at http://0.0.0.0:8889/ > Quit the server with CONTROL-C. -
Now point your browser to the LNDg Python server, for example http://raspibolt.local:8889 (or your node’s IP address, e.g. http://192.168.0.20:8889).
-
The initial login user is “lndg-admin” and the password is the one generated just above. If you didn’t save the password, you can get it again with:
nano /home/lndg/lndg/data/lndg-admin.txt -
Shut down the server with
Ctrl+c -
For extra security, delete the text file that contains the password
$ rm /home/lndg/lndg/data/lndg-admin.txt -
Exit user lndg and return to admin for the next steps.
$ exit
Make the LNDg database easy to backup
LNDg stores the LN node routing statistics and settings in a SQL database. We’ll move this database to our data folder to make it easier to archive or backup if desired.
-
Create the LNDg data directory and copy the database over
$ sudo mkdir /data/lndg $ sudo chown lndg:lndg /data/lndg $ sudo rsync -rhvPog --append-verify /home/lndg/lndg/data/db.sqlite3 /data/lndg -
Check that the database is now in /data/lndg and owned by the “lndg” user
$ ls -la /data/lndg > drwxr-xr-x 2 lndg lndg 4096 Nov 11 11:24 . > drwxr-xr-x 14 admin admin 4096 Nov 11 11:19 .. > -rw-r--r-- 1 lndg lndg 19468288 Nov 11 11:23 db.sqlite3 -
Delete the old database from the LNDg runtime directory and instead create a symbolic link
$ sudo rm /home/lndg/lndg/data/db.sqlite3
$ sudo ln -s /data/lndg/db.sqlite3 /home/lndg/lndg/data/db.sqlite3
$ sudo chown -h lndg:lndg /home/lndg/lndg/data/db.sqlite3
$ sudo ls -la /home/lndg/lndg/data/
> lrwxrwxrwx 1 lndg lndg   21 Nov 11 11:28 db.sqlite3 -> /data/lndg/db.sqlite3
Web server configuration
-
As user
lndginstall uwsgi within the LNDg Python virtual environment$ sudo su - lndg $ cd ~/lndg $ .venv/bin/python -m pip install uwsgi -
Create the initialization file and paste the following lines. Save and exit.
$ nano lndg.ini# lndg.ini file [uwsgi] ########################### # Django-related settings # ########################### # the base directory (full path) chdir = /home/lndg/lndg # Django's wsgi file module = lndg.wsgi # the virtualenv (full path) home = /home/lndg/lndg/.venv #location of log files logto = /var/log/uwsgi/%n.log ############################ # process-related settings # ############################ # master master = true # maximum number of worker processes processes = 1 # the socket (use the full path to be safe socket = /home/lndg/lndg/lndg.sock # ... with appropriate permissions - may be needed chmod-socket = 660 # clear environment on exit vacuum = true -
Create the uwsgi parameter file and paste the following lines. Save and exit.
$ nano uwsgi_paramsuwsgi_param QUERY_STRING $query_string; uwsgi_param REQUEST_METHOD $request_method; uwsgi_param CONTENT_TYPE $content_type; uwsgi_param CONTENT_LENGTH $content_length; uwsgi_param REQUEST_URI "$request_uri"; uwsgi_param PATH_INFO "$document_uri"; uwsgi_param DOCUMENT_ROOT "$document_root"; uwsgi_param SERVER_PROTOCOL "$server_protocol"; uwsgi_param REQUEST_SCHEME "$scheme"; uwsgi_param HTTPS "$https if_not_empty"; uwsgi_param REMOTE_ADDR "$remote_addr"; uwsgi_param REMOTE_PORT "$remote_port"; uwsgi_param SERVER_PORT "$server_port"; uwsgi_param SERVER_NAME "$server_name"; -
Exit the “lndg” user session
$ exit -
Create the uwsgi service file
$ sudo nano /etc/systemd/system/uwsgi.service# RaspiBolt: systemd unit for LNDg uWSGI app # /etc/systemd/system/uwsgi.service [Unit] Description=LNDg uWSGI app After=lnd.service PartOf=lnd.service Wants=jobs-lndg.timer rebalancer-lndg.timer htlc-stream-lndg.service [Service] ExecStart=/home/lndg/lndg/.venv/bin/uwsgi --ini /home/lndg/lndg/lndg.ini User=lndg Group=www-data Restart=on-failure # Wait 4 minutes before starting to give LND time to fully start. Increase if needed. TimeoutStartSec=240 RestartSec=30 KillSignal=SIGQUIT Type=notify NotifyAccess=all [Install] WantedBy=sockets.target -
Create a nginx configuration file for the LNDg website with a server listening on port 8889
$ sudo nano /etc/nginx/sites-available/lndg-ssl.conf -
Paste the following configuration lines. Save and exit.
upstream django { server unix:///home/lndg/lndg/lndg.sock; # for a file socket } server { # the port your site will be served on listen 8889 ssl; listen [::]:8889 ssl; ssl_certificate /etc/ssl/certs/nginx-selfsigned.crt; ssl_certificate_key /etc/ssl/private/nginx-selfsigned.key; ssl_session_timeout 4h; ssl_protocols TLSv1.3; ssl_prefer_server_ciphers on; # the domain name it will serve for server_name _; charset utf-8; # max upload size client_max_body_size 75M; # max wait for django time proxy_read_timeout 180; # Django media location /static { alias /home/lndg/lndg/gui/static; # your Django project's static files - amend as required } # Finally, send all non-media requests to the Django server. location / { uwsgi_pass django; include /home/lndg/lndg/uwsgi_params; # the uwsgi_params file } } -
Create a symlink in the
sites-enableddirectory$ sudo ln -sf /etc/nginx/sites-available/lndg-ssl.conf /etc/nginx/sites-enabled/ -
Open the nginx configuration file
$ sudo nano /etc/nginx/nginx.conf -
Paste the following configuration lines between the existing
eventandstreamblocks . Save and exit.http { ## # Basic Settings ## sendfile on; tcp_nopush on; types_hash_max_size 2048; # server_tokens off; # server_names_hash_bucket_size 64; # server_name_in_redirect off; include /etc/nginx/mime.types; default_type application/octet-stream; ## # SSL Settings ## ssl_protocols TLSv1.3; ssl_prefer_server_ciphers on; ## # Logging Settings ## access_log /var/log/nginx/access.log; error_log /var/log/nginx/error.log; ## # Gzip Settings ## gzip on; # gzip_vary on; # gzip_proxied any; # gzip_comp_level 6; # gzip_buffers 16 8k; # gzip_http_version 1.1; # gzip_types text/plain text/css application/json application/javascript text/xml application/xml application/xml+rss text/javascript; ## # Virtual Host Configs ## include /etc/nginx/conf.d/*.conf; include /etc/nginx/sites-enabled/*; } -
Create the log and sock files
# Log file $ sudo mkdir /var/log/uwsgi $ sudo touch /var/log/uwsgi/lndg.log $ sudo chgrp -R www-data /var/log/uwsgi $ sudo chmod 660 /var/log/uwsgi/lndg.log # Sock file $ sudo touch /home/lndg/lndg/lndg.sock $ sudo chown lndg:www-data /home/lndg/lndg/lndg.sock $ sudo chmod 660 /home/lndg/lndg/lndg.sock -
Test the nginx configuration
$ sudo nginx -t > nginx: the configuration file /etc/nginx/nginx.conf syntax is ok > nginx: configuration file /etc/nginx/nginx.conf test is successful -
Enable and start the uwsgi service
$ sudo systemctl enable uwsgi $ sudo systemctl start uwsgi $ sudo systemctl status uwsgi > [...] > Sep 25 22:47:21 raspibolt systemd[1]: Starting LNDg uWSGI app... > Sep 25 22:47:21 raspibolt uwsgi[1371109]: [uWSGI] getting INI configuration from /home/lndg/lndg/lndg.ini > Sep 25 22:47:22 raspibolt systemd[1]: Started LNDg uWSGI app. -
To check the uwsgi log (Ctrl+c to exit the log)
$ sudo journalctl -f -u uwsgi -
Restart nginx
$ sudo systemctl restart nginx
You can now access LNDg from within your local network by browsing to https://raspibolt.local:8889 (or your equivalent IP address).
Backend refreshes
LNDg uses a Python script (~/lndg/jobs.py), to gather data about your node that is then displayed in the GUI dashboard. To have updated information in the GUI, it is necessary to regularly run the script to collect new data.
-
Create a systemd service file to run the LNDg
jobs.pyPython script. Save (Ctrl+o) and exit (Ctrl+x).$ sudo nano /etc/systemd/system/jobs-lndg.service# RaspiBolt: systemd unit for LNDg # /etc/systemd/system/jobs-lndg.service [Unit] Description=LNDg backend refreshes Python script [Service] ExecStart=/home/lndg/lndg/.venv/bin/python /home/lndg/lndg/jobs.py User=lndg StandardError=append:/var/log/lnd_jobs_error.log RuntimeMaxSec=3600 -
Create a systemd timer to activate the service every 20 seconds. Save (Ctrl+o) and exit (Ctrl+x).
$ sudo nano /etc/systemd/system/jobs-lndg.timer# RaspiBolt: systemd unit for LNDg # /etc/systemd/system/jobs-lndg.timer [Unit] Description=Timer to activate jobs-lndg.service every 20 seconds After=uwsgi.service PartOf=uwsgi.service [Timer] OnBootSec=300 OnUnitActiveSec=20 AccuracySec=1 [Install] WantedBy=timers.target -
Enable the timer to start at boot. Start the timer and check its status. Exit with
Ctrl+c.$ sudo systemctl enable jobs-lndg.timer $ sudo systemctl start jobs-lndg.timer $ sudo systemctl status jobs-lndg.timer > [...] > Loaded: loaded (/etc/systemd/system/jobs-lndg.timer; enabled; vendor preset: enabled) > Active: active (running) since Fri 2022-11-11 14:09:08 GMT; 56min ago > [...] -
Check that the backend refreshes Python script is run every 20 seconds or so
$ sudo journalctl -f -u jobs-lndg.service
> [...]
> Nov 11 14:25:24 raspibolt systemd[1]: Started LNDg backend refreshes Python script.
> Nov 11 14:25:27 raspibolt systemd[1]: jobs-lndg.service: Succeeded.
> Nov 11 14:25:27 raspibolt systemd[1]: jobs-lndg.service: Consumed 3.063s CPU time.
> Nov 11 14:25:44 raspibolt systemd[1]: Started LNDg backend refreshes Python script.
> Nov 11 14:25:47 raspibolt systemd[1]: jobs-lndg.service: Succeeded.
> Nov 11 14:25:47 raspibolt systemd[1]: jobs-lndg.service: Consumed 3.107s CPU time.
Rebalancer runs
LNDg uses a Python script (~/lndg/rebalancer.py) to automatically create circular rebalancing payments based on user-defined parameters.
-
Create a systemd service file to run the LNDg
rebalancer.pyPython script. Save (Ctrl+o) and exit (Ctrl+x).$ sudo nano /etc/systemd/system/rebalancer-lndg.service# RaspiBolt: systemd unit for LNDg # /etc/systemd/system/rebalancer-lndg.service [Unit] Description=LNDg rebalancer Python script [Service] ExecStart=/home/lndg/lndg/.venv/bin/python /home/lndg/lndg/rebalancer.py User=lndg StandardError=append:/var/log/lnd_jobs_error.log RuntimeMaxSec=3600 -
Create a systemd timer to activate the service every 20 seconds. Save (Ctrl+o) and exit (Ctrl+x).
$ sudo nano /etc/systemd/system/rebalancer-lndg.timer# RaspiBolt: systemd unit for LNDg # /etc/systemd/system/rebalancer-lndg.timer [Unit] Description=Timer to activate rebalancer-lndg.service every 20 seconds After=uwsgi.service PartOf=uwsgi.service [Timer] OnBootSec=300 OnUnitActiveSec=20 AccuracySec=1 [Install] WantedBy=timers.target -
Enable the timer to start at boot. Start the timer and check its status. Exit with
Ctrl+c.$ sudo systemctl enable rebalancer-lndg.timer $ sudo systemctl start rebalancer-lndg.timer $ sudo systemctl status rebalancer-lndg.timer > [...] > Loaded: loaded (/etc/systemd/system/rebalancer-lndg.timer; enabled; vendor preset: enabled) > Active: active (running) since Fri 2022-11-11 11:49:59 GMT; 3h 12min ago > [...] -
Check that the rebalancer Python script is running regularly.
Note: It might take a few minutes for the rebalancing script to complete its tasks.$ sudo journalctl -f -u rebalancer-lndg.service > [...] > Nov 11 14:52:30 raspibolt systemd[1]: rebalancer-lndg.service: Consumed 1.674s CPU time. > Nov 11 14:52:48 raspibolt systemd[1]: Started LNDg rebalancer Python script. > Nov 11 14:58:50 raspibolt systemd[1]: rebalancer-lndg.service: Succeeded. > Nov 11 14:58:50 raspibolt systemd[1]: rebalancer-lndg.service: Consumed 15.770s CPU time. > Nov 11 14:58:50 raspibolt systemd[1]: Started LNDg rebalancer Python script.
HTLC failure stream data
LNDg uses a Python script (~/lndg/htlc_stream.py) to keep a log of failed HTLCs on your node. The list of failed HTLCs together with some information can be seen in the GUI at https://raspibolt.local:8889/failed_htlcs. The last 10 failed HTLCs are also displayed at the bottom of the home webpage.
-
Create a systemd service file to run the LNDg
htlc_stream.pyPython script. Save (Ctrl+o) and exit (Ctrl+x).$ sudo nano /etc/systemd/system/htlc-stream-lndg.service# RaspiBolt: systemd unit for LNDg # /etc/systemd/system/htlc-stream-lndg.service [Unit] Description=LNDg HTLC stream Python script After=uwsgi.service PartOf=uwsgi.service [Service] ExecStart=/home/lndg/lndg/.venv/bin/python /home/lndg/lndg/htlc_stream.py User=lndg StandardError=append:/var/log/lnd_htlc_stream_error.log Restart=always RestartSec=60s [Install] WantedBy=multi-user.target -
Enable the service to start at boot. Start the service and check its status. Exit with
Ctrl+c.$ sudo systemctl enable htlc-stream-lndg.service $ sudo systemctl start htlc-stream-lndg.service $ sudo systemctl status htlc-stream-lndg.service > [...] > Loaded: loaded (/etc/systemd/system/htlc-stream-lndg.service; enabled; vendor preset: enabled) > Active: active (running) since Fri 2022-11-11 15:20:59 GMT; 1s ago > [...]
Dashboard privacy configuration
LNDg offers the possibility to create links to blockchain and lightning explorers on node aliases and transaction IDs. By default, LNDg uses public websites 1ml.com for its lightning explorer and mempool.space for its blockchain explorer.
Blockchain explorer
To preserve privacy it is better that you use your own self-hosted blockchain explorer (e.g. the BTC RPC Explorer).
- Open your LNDg website at https://raspibolt.local:8889 (replace raspibolt.local by your node’s IP address if necessary)
- Click on the “Advanced settings” link
- Scroll down to the “Update Local Settings” section
- Find the “NET URL” option and paste the following value:
- if you use the BTC RPC Explorer:
https://raspibolt.local:4000 - if you prefer Mempool:
https://raspibolt.local:4081
- if you use the BTC RPC Explorer:
Lightning explorer
Although there is not yet a self-hosted, private, lightning explorer, the Mempool lightning explorer offers a better lightning explorer than 1ML and is probably less likely to log your IP address.
- Find the “Graph URL” option and paste the following value:
- if you don’t want to leak your IP address, delete the content of the box and leave it empty
- if you want to use Mempool, enter:
https://mempool.space/lightning. As an additional privacy step, you might want to have a VPN running on your computer.
Remote access over Tor (optional)
Do you want to access LNDg remotely? You can easily do so by adding a Tor hidden service on the RaspiBolt and accessing LNDg with the Tor browser from any device.
-
Add the following three lines in the “location-hidden services” section in the
torrc file. Save and exit.$ sudo nano /etc/tor/torrc############### This section is just for location-hidden services ### # Hidden service LNDg HiddenServiceDir /var/lib/tor/hidden_service_lndg/ HiddenServiceVersion 3 HiddenServicePort 443 127.0.0.1:8889 -
Reload Tor configuration and get your connection address.
$ sudo systemctl reload tor
$ sudo cat /var/lib/tor/hidden_service_lndg/hostname
> abcdefg..............xyz.onion
With the Tor browser, you can access this onion address from any device.
For the future: LNDg update
-
With user “admin”, stop the
uwsgisystemd service. The other LNDg systemd timers and services will stop automatically.$ sudo systemctl stop uwsgi.service $ sudo su - lndg -
Fetch the latest GitHub repository information, display the release tags (use the latest 1.7.1 in this example), and update:
$ cd /home/lndg/lndg $ git fetch $ git reset --hard HEAD $ git tag $ git checkout v1.7.1 $ .venv/bin/pip install -r requirements.txt $ .venv/bin/pip install --upgrade protobuf $ rm lndg/settings.py $ .venv/bin/python initialize.py -wn $ .venv/bin/python manage.py migrate $ exit -
Start the
uwsgisystemd service again. The other LNDg timers and services will start automatically.$ sudo systemctl start uwsgi.service
Uninstall
-
Stop and disable the
uwsgisystemd service$ sudo systemctl stop uwsgi.service $ sudo systemctl disable uwsgi.service -
Delete all the LNDg systemd services and timers
$ cd /etc/systemd/system/ $ sudo rm uwsgi.service jobs-lndg.service rebalancer-lndg.service htlc-stream-lndg.service $ sudo rm jobs-lndg.timer rebalancer-lndg.timer $ cd -
Display the UFW firewall rules and notes the numbers of the rules for Mempool (e.g., X and Y below)
$ sudo ufw status numbered > [...] > [X] 8889/tcp ALLOW IN Anywhere # allow LNDg SSL > [...] > [Y] 8889/tcp (v6) ALLOW IN Anywhere (v6) # allow LNDg SSL -
Delete the two LNDg rules (check that the rule to be deleted is the correct one and type “y” and “Enter” when prompted)
$ sudo ufw delete Y $ sudo ufw delete X -
Delete the LNDg nginx configuration file and symlink
$ sudo rm /etc/nginx/sites-available/lndg-ssl.conf $ sudo rm /etc/nginx/sites-enabled/lndg-ssl.conf -
Delete or comment out the HTTP server block from the
nginx.conffile (unless you use it for another service, e.g. Mempool, Homer etc)$ sudo nano /etc/nginx/nginx.conf#http { # [...] #} -
Test the nginx configuration & restart nginx
$ sudo nginx -t > nginx: the configuration file /etc/nginx/nginx.conf syntax is ok > nginx: configuration file /etc/nginx/nginx.conf test is successful $ sudo systemctl reload nginx -
Delete the uwsgi log file
$ sudo rm /var/log/uwsgi/lndg.log -
Delete the “lndg” user. Do not worry about the
userdel: mempool mail spool (/var/mail/lndg) not found.$ sudo su - $ userdel -r lndg > userdel: lndg mail spool (/var/mail/lndg) not found] $ exit
« Back: + Lightning