Operating system
We configure the Raspberry Pi and install the Linux operating system.
Table of contents
- Which operating system to use?
- Get Raspberry Pi OS
- Configure boot options
- Write the operating system to the external drive
- Start your Pi
- Does it boot?
- Fallback: if you can’t boot from your external drive
Which operating system to use?
We use the Raspberry Pi Operating System (RasPi OS) Lite, without a graphical user interface, and in the 64-bit version. This provides the best stability for the Raspberry Pi and makes the initial setup a breeze.
RasPi OS (Legacy) is based on the Debian 12 Bookworm Linux distribution, which is available for most hardware platforms. To make this guide as universal as possible, it uses only standard Debian commands. As a result, it should work smoothly with Raspberry Pis while still being compatible with most other hardware platforms running Debian.
Get Raspberry Pi OS
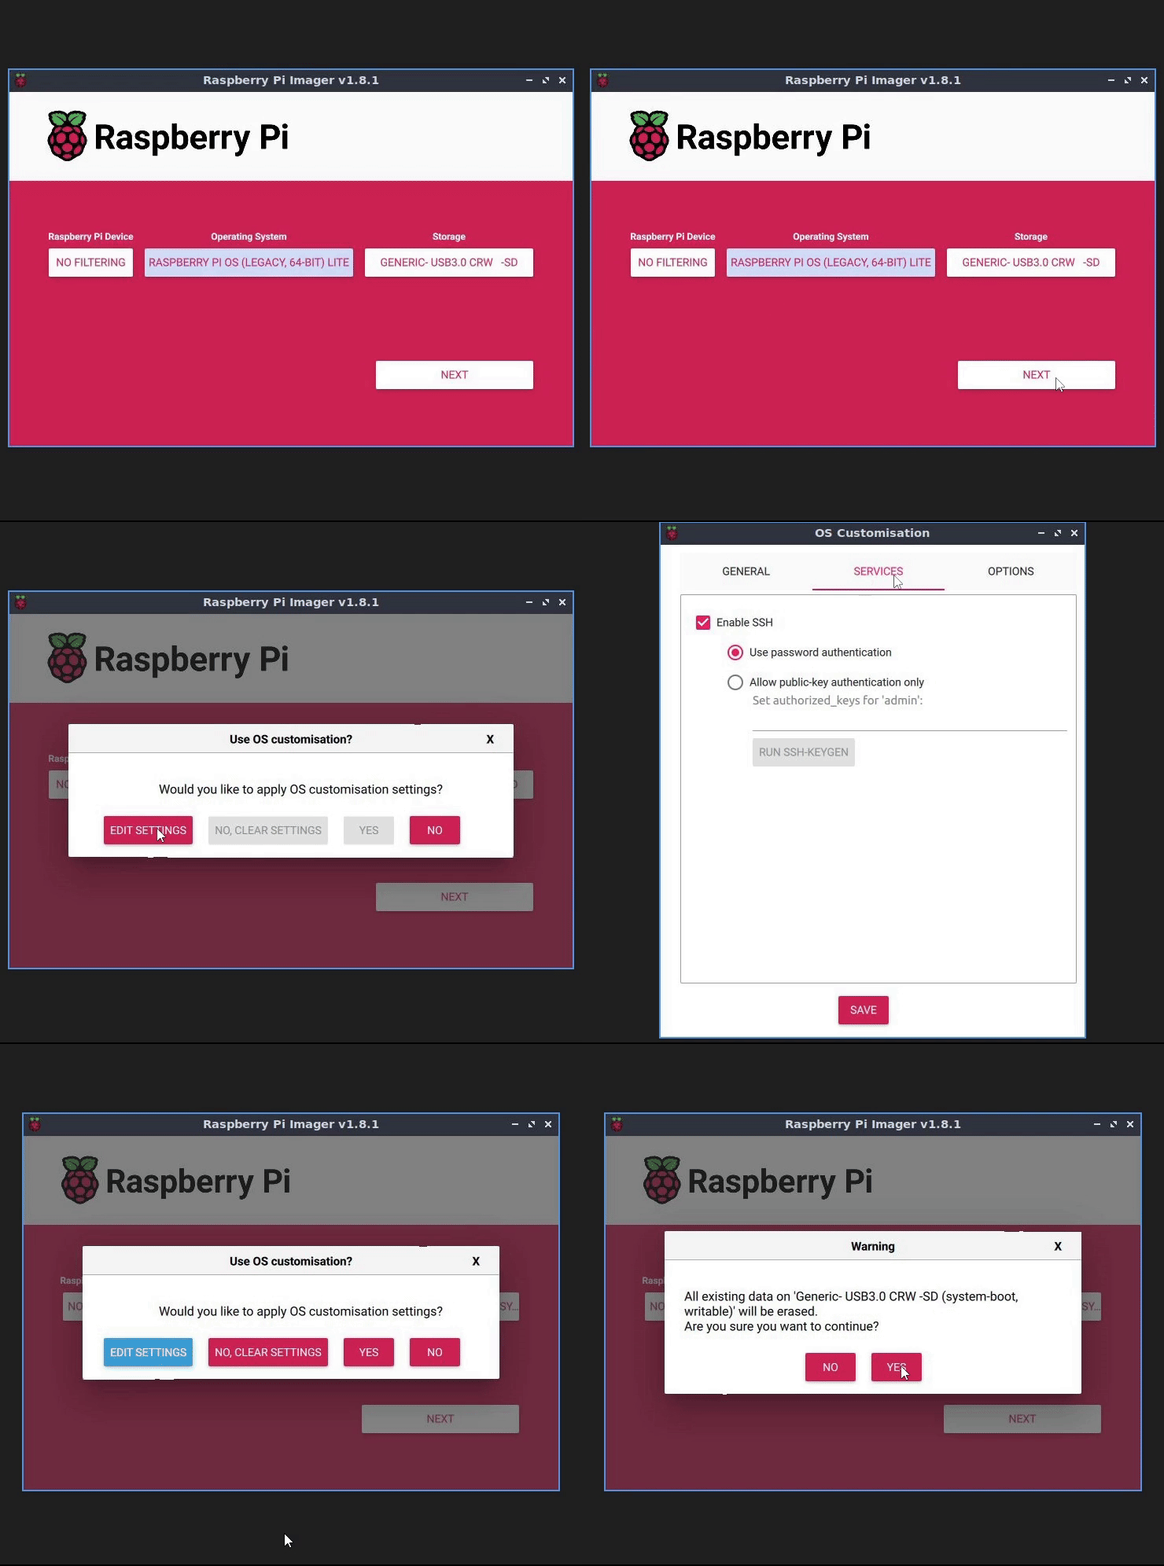
In order to write the operating system to the external drive, we will use the Raspberry Pi Imager application v1.8+.
- Start the Raspberry Pi Imager
- On the “Raspberry Pi device” section > Push on “Choose device” > Select “No filtering”
- On the “Operating system” section > Push on “Choose OS” > “Raspberry Pi OS (other)” > Scroll to select “Raspberry Pi OS (Legacy, 64 bit) Lite” and have the relevant image flashed to your drive
- Connect the external drive to your regular computer. On the “Storage” section > Push on “Choose storage” > Select your external drive
- Click on the “NEXT” button
- On the “Use OS customisation” banner > Click on the “EDIT SETTINGS” button
Configure boot options
You can now pre-configure the operating system even before it’s started for the first time.
Configure the advanced options as follows.
On the “General” tab:
-
Set hostname: choose and enter a local network name for your node, for example,
raspibolt.Note: if you’re using a different platform, you can adjust the hostname later by replacing it in the file
/etc/hostnameand adding it at the end of the first line in/etc/hosts. -
Set username and password: activate the checkbox and enter
admintogether with yourpassword [A].This will create the user
adminwhich we will use primarily in this guide, making it more universal. -
Configure wifi: if you’ll run the RaspiBolt connected to your wireless network, simply enter the wifi name (“SSID”) and password. Also change “Wifi country” to the two-letter ISO2 code of your country (e.g.,
US).If you’ll connect your RaspiBolt with a network cable, simply skip this setting.
-
Set locale settings: activate the checkbox, select your timezone and keyboard layout.
On the “Services” tab:
-
Enable SSH: activate the checkbox and select “Use password authentication”
This will allow you to connect to the Raspberry Pi remotely using “Secure SHell” without ever connecting it to a keyboard or screen.
-
That’s it. (Optional) If you want to improve your privacy, you can uncheck “Enable telemetry” on the “Options” tab; or ignore it.
-
Click on “SAVE”.
Write the operating system to the external drive
-
The “Use OS customisation” banner shows you again > Click this time on the “YES” button.
-
Read the warning banner carefully and make sure you selected the right drive, then click “YES”.
The Raspberry Pi Imager now writes the operating system to your drive and verifies it. It should display a “Success” message after.

Start your Pi
- Safely eject the external drive from your computer
- Connect it to your Pi
- If you did not configure the Wifi settings: connect the Pi to your network with an ethernet cable
- Start the Pi by connecting it to the power adapter using the USB-C cable
Does it boot?
The 🔴 red LED on the Pi will indicate that the device is powered on.
The 🟢 green LED should be flickering constantly after a few seconds, indicating activity. If the green LED is lit constantly, without flickering, your Pi is probably not yet configured to boot from USB.
To enable booting from USB, follow these steps:
- Get your hands on a microSD card (all data will be deleted, but you only need it once)
- Using the Raspberry Pi Imager, write config bootloader to enable “USB Boot” to the microSD card
- With “No filtering” selected on the “Raspberry Pi device” section, on the “Operating system” section > Push on “Choose OS” > “Misc utility images > Select Bootloader (Pi 4 or Pi 5) family, depending on your Raspberry Pi version > USB Boot
- Connect the microSD to your regular computer. On the “Storage” section > Push on “Choose storage” > Select your microSD
- Click on the “NEXT” button
- Read the warning banner carefully and make sure you selected the right drive, then click “YES”.
The Raspberry Pi Imager now writes on your microSD and verifies it. It should display a “Success” message after.
- Boot your Pi with this microSD card
- Once the green LED blinks constantly, you can disconnect the power
- Remove the microSD card and start your Pi again with the SSD connected
Your Raspberry Pi should now boot from the SSD attached via USB.
Fallback: if you can’t boot from your external drive
We assume that you can boot directly from the external drive. This method works for most modern drives, but if it doesn’t work in your case, please follow the fallback instructions Boot from microSD card instead of external drive.
Next: Remote access »