Bonus guide: Fulcrum server
Fulcrum is a fast & nimble SPV server for Bitcoin Cash, Bitcoin BTC, and Litecoin created by Calin Culianu. It can be used as an alternative to Electrs because of its performance, as we can see in Craig Raw’s comparison of servers
Difficulty: Medium
Status: Tested v3

Table of contents
- Bonus guide: Fulcrum server
- Requirements
- Preparations
- Installation
- Extras
- For the future: Fulcrum upgrade
- Uninstall
Requirements
- Bitcoin Core
- Storage space for database (external backup recommended); currently takes up 133GB (as of Aug 2023).
Fulcrum is a replacement for an Electrs, these two services cannot be run at the same time (due to the same standard ports used), remember to stop Electrs doing “sudo systemctl stop electrs”. Performance issues have been found on Raspberry Pi 4GB, it is recommended to install Fulcrum on 8GB RAM version.
Preparations
Make sure that you have reduced the database cache of Bitcoin Core
Install dependencies
-
With user “admin”, make sure that all necessary software packages are installed
$ sudo apt install libssl-dev
Install zram-swap
zram-swap is a compressed swap in memory and on disk and is necessary for the proper functioning of Fulcrum during the sync process using compressed swap in memory (increase performance when memory usage is high)
-
Access to “admin” home folder, clone the repository of GitHub and install zram-swap
$ cd /home/admin/ $ git clone https://github.com/foundObjects/zram-swap.git $ cd zram-swap && sudo ./install.sh -
Set following size value in zram configuration file. Save and exit
$ sudo nano /etc/default/zram-swap#_zram_fraction="1/2" #Comment this line _zram_fixedsize="10G" #Uncomment and edit -
Add kernel parameters to make better use of zram
$ sudo nano /etc/sysctl.conf -
Here are the lines you’ll want to add at the end of your /etc/sysctl.conf file to make better use of zram. Save and exit
vm.vfs_cache_pressure=500 vm.swappiness=100 vm.dirty_background_ratio=1 vm.dirty_ratio=50 -
Then apply the changes with
$ sudo sysctl --system -
Restart the service
$ sudo systemctl restart zram-swap -
Make sure zram was correctly installed, zram prioritized, and autoboot enabled
$ sudo cat /proc/swaps -
Expected output:
Filename Type Size Used Priority /var/swap file 102396 0 -2 /dev/zram0 partition 102396 0 5 -
Check the status of zram-swap service
$ sudo systemctl status zram-swap -
Expected output, find enabled label:
zram-swap.service - zram swap service
Loaded: loaded (/etc/systemd/system/zram-swap.service; enabled; vendor preset: enabled)
Active: active (exited) since Mon 2022-08-08 00:51:51 CEST; 10s ago
Process: 287452 ExecStart=/usr/local/sbin/zram-swap.sh start (code=exited, status=0/SUCCESS)
Main PID: 287452 (code=exited, status=0/SUCCESS)
CPU: 191ms

Aug 08 00:51:51 node systemd[1]: Starting zram swap service...
Aug 08 00:51:51 node zram-swap.sh[287471]: Setting up swapspace version 1, size = 4.6 GiB (4972199936 bytes)
...
Configure Firewall
-
Configure the firewall to allow incoming requests
$ sudo ufw allow 50002/tcp comment 'allow Fulcrum SSL'
$ sudo ufw allow 50001/tcp comment 'allow Fulcrum TCP'
Configure Bitcoin Core
We need to set up settings in Bitcoin Core configuration file - add new lines if they are not present
-
In
bitcoin.conf, add the following line in “# Connections” section. Save and exit$ sudo nano /data/bitcoin/bitcoin.confzmqpubhashblock=tcp://127.0.0.1:8433 -
Restart Bitcoin Core
$ sudo systemctl restart bitcoind
Installation
Download and set up Fulcrum
We have our Bitcoin Core configuration file set up, and now we can move to next part - installation of Fulcrum
-
Check the latest Fulcrum release version. You can also confirm with the release page
$ LATEST_VERSION=$(wget -qO- https://api.github.com/repos/cculianu/Fulcrum/releases/latest | grep -oP '"tag_name": "v\K(.*)(?=")') $ echo $LATEST_VERSION -
Download the application, checksums and signature
You can also use the latest release version (
$LATEST_VERSION). However, please be aware that newer release versions might not have been thoroughly tested with the rest of the RaspiBolt configuration.$ VERSION="1.9.7" $ cd /tmp $ wget https://github.com/cculianu/Fulcrum/releases/download/v$VERSION/Fulcrum-$VERSION-arm64-linux.tar.gz $ wget https://github.com/cculianu/Fulcrum/releases/download/v$VERSION/Fulcrum-$VERSION-shasums.txt.asc $ wget https://github.com/cculianu/Fulcrum/releases/download/v$VERSION/Fulcrum-$VERSION-shasums.txt -
Get the public key from the Fulcrum developer
$ curl https://raw.githubusercontent.com/Electron-Cash/keys-n-hashes/master/pubkeys/calinkey.txt | gpg --import -
Verify the signature of the text file containing the checksums for the application
$ gpg --verify Fulcrum-$VERSION-shasums.txt.asc > gpg: assuming signed data in 'Fulcrum-1.9.7-sha256sums.txt' > gpg: Signature made Fri 24 Nov 2023 08:27:08 AM UTC > gpg: using DSA key D465135F97D0047E18E99DC321810A542031C02C > gpg: Good signature from "Calin Culianu (NilacTheGrim) <calin.culianu@gmail.com>" [unknown] > gpg: WARNING: This key is not certified with a trusted signature! > gpg: There is no indication that the signature belongs to the owner. > Primary key fingerprint: D465 135F 97D0 047E 18E9 9DC3 2181 0A54 2031 C02C -
Verify the signed checksum against the actual checksum of your download
$ grep 'arm64-linux.tar.gz' Fulcrum-$VERSION-shasums.txt | sha256sum --check
Expected output:
> Fulcrum-1.9.7-arm64-linux.tar.gz: OK
-
Install Fulcrum and check the correct installation requesting the version
$ tar -xvf Fulcrum-$VERSION-arm64-linux.tar.gz
$ sudo install -m 0755 -o root -g root -t /usr/local/bin Fulcrum-$VERSION-arm64-linux/Fulcrum Fulcrum-$VERSION-arm64-linux/FulcrumAdmin
$ Fulcrum --version
> Fulcrum 1.9.7 (Release f27fc28)
> Protocol: version min: 1.4, version max: 1.5.2
> compiled: gcc 9.4.0
> jemalloc: version 5.2.1-0-gea6b3e9
> Qt: version 5.15.6
> rocksdb: version 6.14.6-ed43161
[...]
Data directory
Now that Fulcrum is installed, we need to configure it to run automatically on startup.
-
Create the “fulcrum” service user, and add it to “bitcoin” group
$ sudo adduser --disabled-password --gecos "" fulcrum $ sudo adduser fulcrum bitcoin -
Create the fulcrum data directory
$ sudo mkdir -p /data/fulcrum/fulcrum_db $ sudo chown -R fulcrum:fulcrum /data/fulcrum/ -
Create a symlink to /home/fulcrum/.fulcrum
$ sudo ln -s /data/fulcrum /home/fulcrum/.fulcrum $ sudo chown -R fulcrum:fulcrum /home/fulcrum/.fulcrum -
Open a “fulcrum” user session
$ sudo su - fulcrum -
Change to fulcrum data folder and generate cert and key files for SSL. When it asks you to put some info, press
Enteruntil the prompt is shown again, is not necessary to put any info$ cd /data/fulcrum $ openssl req -newkey rsa:2048 -new -nodes -x509 -days 3650 -keyout key.pem -out cert.pem
Configuration
RaspiBolt uses SSL as default for Fulcrum, but some wallets like BlueWallet do not support SSL over Tor. Thats why we use TCP in configurations as well to let user choose what he needs. You may as well need to use TCP for other reasons.
-
Next, we have to set up our Fulcrum configurations. Troubles could be found without optimizations for Raspberry Pi. Choose either one for Raspberry 4GB or 8GB depending on your hardware. Create the config file with the following content. Save and exit
$ nano /data/fulcrum/fulcrum.conf# RaspiBolt: fulcrum configuration # /data/fulcrum/fulcrum.conf # Bitcoin Core settings bitcoind = 127.0.0.1:8332 rpccookie = /data/bitcoin/.cookie # Fulcrum server settings datadir = /data/fulcrum/fulcrum_db cert = /data/fulcrum/cert.pem key = /data/fulcrum/key.pem ssl = 0.0.0.0:50002 tcp = 0.0.0.0:50001 peering = false # RPi optimizations bitcoind_timeout = 600 bitcoind_clients = 1 worker_threads = 1 db_mem = 1024.0 # 4GB RAM (default) db_max_open_files = 200 fast-sync = 1024 # 8GB RAM (comment the last two lines and uncomment the next) #db_max_open_files = 400 #fast-sync = 2048 -
Exit “fulcrum” user session to return to “admin” user session
$ exit
Autostart on boot
Fulcrum needs to start automatically on system boot.
-
As user “admin”, create the Fulcrum systemd unit and copy/paste the following configuration. Save and exit
$ sudo nano /etc/systemd/system/fulcrum.service# RaspiBolt: systemd unit for Fulcrum # /etc/systemd/system/fulcrum.service [Unit] Description=Fulcrum PartOf=bitcoind.service After=bitcoind.service StartLimitBurst=2 StartLimitIntervalSec=20 [Service] ExecStart=/usr/local/bin/Fulcrum /data/fulcrum/fulcrum.conf KillSignal=SIGINT User=fulcrum Type=exec TimeoutStopSec=300 RestartSec=30 Restart=on-failure [Install] WantedBy=multi-user.target
Run Fulcrum
-
Enable fulcrum service and start
$ sudo systemctl enable fulcrum.service $ sudo systemctl start fulcrum.service -
We can check if everything goes right using these commands
$ sudo systemctl status fulcrum
$ sudo journalctl -f -u fulcrum
Expected output:
  Apr 27 21:20:52 rasp Fulcrum[3994155]: [2023-04-27 21:20:52.264] simdjson: version 0.6.0
  Apr 27 21:20:52 rasp Fulcrum[3994155]: [2023-04-27 21:20:52.264] ssl: OpenSSL 1.1.1  11 Sep 2018
  Apr 27 21:20:52 rasp Fulcrum[3994155]: [2023-04-27 21:20:52.264] zmq: libzmq version: 4.3.3, cppzmq version: 4.7.1
  Apr 27 21:20:52 rasp Fulcrum[3994155]: [2023-04-27 21:20:52.264] Fulcrum 1.9.1 (Release 713d2d7) - Thu Apr 27, 2023 21:20:52.264 EEST - starting up ...
  Apr 27 21:20:52 rasp Fulcrum[3994155]: [2023-04-27 21:20:52.264] Max open files: 524288 (increased from default: 1024)
  Apr 27 21:20:52 rasp Fulcrum[3994155]: [2023-04-27 21:20:52.265] Loading database ...
  Apr 27 21:21:03 rasp Fulcrum[3994155]: [2023-04-27 21:21:03.907] DB memory: 1024.00 MiB
  Apr 27 21:21:03 rasp Fulcrum[3994155]: [2023-04-27 21:21:03.907] Coin: BTC
  Apr 27 21:21:03 rasp Fulcrum[3994155]: [2023-04-27 21:21:03.907] Chain: main
  Apr 27 21:21:05 rasp Fulcrum[3994155]: [2023-04-27 21:21:05.190] Verifying headers ...
  Apr 27 21:21:13 rasp Fulcrum[3994155]: [2023-04-27 21:21:13.337] Initializing header merkle cache ...
  Apr 27 21:21:16 rasp Fulcrum[3994155]: [2023-04-27 21:21:16.074] Checking tx counts ...
  [...]
Fulcrum will now index the whole Bitcoin blockchain so that it can provide all necessary information to wallets. With this, the wallets you use no longer need to connect to any third-party server to communicate with the Bitcoin peer-to-peer network.
DO NOT REBOOT OR STOP THE SERVICE DURING DB CREATION PROCESS. YOU MAY CORRUPT THE FILES - in case of that happening, start sync from scratch by deleting and recreating fulcrum_db folder.
💡 Fulcrum must first fully index the blockchain and compact its database before you can connect to it with your wallets. This can take up to ~3.5 - 4 days. Only proceed with the Desktop Wallet Section once Fulcrum is ready.
💡 After the initial sync of Fulcrum, if you want to still use zram, you can return to the default zram config following the next instructions
-
As user “admin”, access to zram config again and return to default config. Save and exit
$ sudo nano /etc/default/zram-swap_zram_fraction="1/2" #Uncomment this line #_zram_fixedsize="10G" #Comment this line -
Then apply the changes with
$ sudo sysctl --system -
Restart the service
$ sudo systemctl restart zram-swap -
Make sure the change was correctly done
$ sudo cat /proc/swaps -
Expected output:
Filename                                Type                Size           Used    Priority
/var/swap                              file                 102396         0       -2
/dev/zram0                             partition            20479          0        5
Extras
Remote access over Tor (optional)
To use your Fulcrum server when you’re on the go, you can easily create a Tor hidden service. This way, you can connect the BitBoxApp or Electrum wallet also remotely, or even share the connection details with friends and family. Note that the remote device needs to have Tor installed as well.
-
Ensure that you are logged with user “admin” and add the following three lines in the section for “location-hidden services” in the torrc file. Save and exit
$ sudo nano /etc/tor/torrc -
Edit torrc
############### This section is just for location-hidden services ### # Hidden Service Fulcrum SSL HiddenServiceDir /var/lib/tor/hidden_service_fulcrum_ssl/ HiddenServiceVersion 3 HiddenServicePort 50002 127.0.0.1:50002 # Hidden Service Fulcrum TCP HiddenServiceDir /var/lib/tor/hidden_service_fulcrum_tcp/ HiddenServiceVersion 3 HiddenServicePort 50001 127.0.0.1:50001 -
Reload Tor configuration and get your connection address
$ sudo systemctl reload tor$ sudo cat /var/lib/tor/hidden_service_fulcrum_ssl/hostname > abcdefg..............xyz.onion$ sudo cat /var/lib/tor/hidden_service_fulcrum_tcp/hostname > abcdefg..............xyz.onion -
You should now be able to connect to your Fulcrum server remotely via Tor using SSL or TCP.
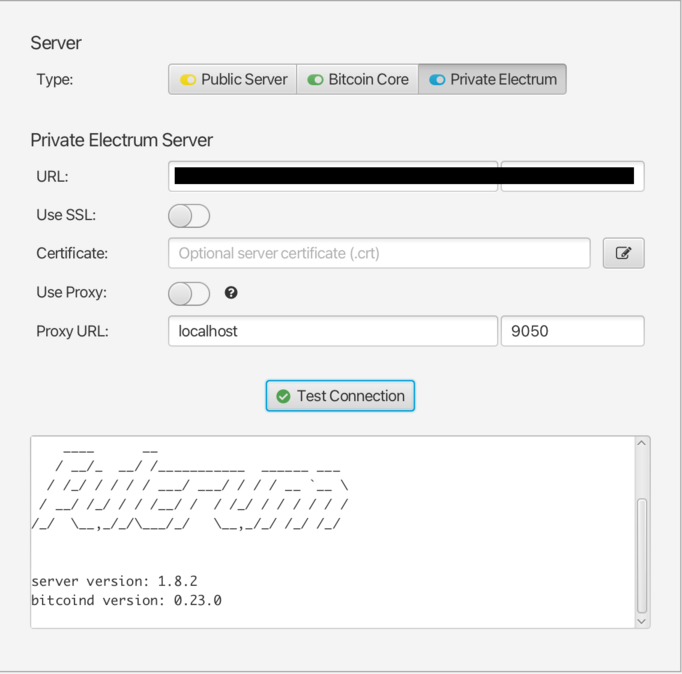
Add banner to Fulcrum server (For fun!)
You can get creative when making your server banner, for example creating your own ASCII art. In Fulcrum docs you can find additional info about making a banner in the “# Server banner text file - ‘banner’” section.
-
Create and open
banner.txtfile inside Fulcrum directory$ sudo nano /data/fulcrum/banner.txt -
Paste your own creation into
banner.txt. Save and exit____ __ / __/_ __/ /___________ ______ ___ / /_/ / / / / ___/ ___/ / / / __ `__ \ / __/ /_/ / / /__/ / / /_/ / / / / / / /_/ \__,_/_/\___/_/ \__,_/_/ /_/ /_/ server version: $SERVER_VERSION bitcoind version: $DAEMON_VERSION -
Open
fulcrum.conf$ sudo nano /data/fulcrum/fulcrum.conf -
Specify path to banner at the end of your configuration file. Save and exit
# Banner path banner = /data/fulcrum/banner.txt -
Restart Fulcrum
$ sudo systemctl restart fulcrum.service
Now you should see your banner when connecting to Fulcrum with supported wallet (ex. Sparrow)
Configure BTC RPC Explorer to Fulcrum API connection and modify the service
To get address balances, either an Electrum server or an external service is necessary. Your local Fulcrum server can provide address transaction lists, balances, and more.
-
Change to
btcrpcexploreruser, enter tobtc-rpc-explorerfolder and open.envfile$ sudo su - btcrpcexplorer $ cd btc-rpc-explorer $ nano .env -
Add or modify the following line. Save and exit
BTCEXP_ELECTRUM_SERVERS=tls://127.0.0.1:50002 -
Return to
adminuser by exiting and openbtcrpcexplorerservice$ exit $ sudo nano /etc/systemd/system/btcrpcexplorer.service -
Replace
"After=electrs.service"to"After=fulcrum.service"parameter. Save and exitAfter=fulcrum.service -
Restart BTC RPC Explorer service to apply the changes
$ sudo systemctl restart btcrpcexplorer
Backup the database
If the database gets corrupted and you don’t have a backup, you will have to resync it from scratch, which takes several days. This is why we recommend to make backups of the database once in a while, on an external drive. Like this, if something happens, you’ll only have to resync since the date of your latest backup. Before doing the backup, remember to stop Fulcrum doing "sudo systemctl stop fulcrum".
For the future: Fulcrum upgrade
-
As “admin” user, stop the Fulcrum service
$ sudo systemctl stop fulcrum -
Verify Bitcoin Core configuration as described in the Configure Bitcoin Core section of this guide
-
Download, verify and install the latest Fulcrum binaries as described in the Download and set up Fulcrum section of this guide
-
Start Fulcrum service
$ sudo systemctl start fulcrum
Uninstall
Uninstall Fulcrum
Ensure you are logged with user “admin”
-
Stop, disable and delete the service
$ sudo systemctl stop fulcrum $ sudo systemctl disable fulcrum $ sudo rm /etc/systemd/system/fulcrum.service -
Delete “fulcrum” user
$ sudo userdel -r fulcrum -
Delete fulcrum directory
$ sudo rm -rf /data/fulcrum/
Uninstall Tor hidden service
-
Comment or remove fulcrum hidden service in torrc. Save and exit
$ sudo nano /etc/tor/torrc############### This section is just for location-hidden services ### # Hidden Service Fulcrum SSL #HiddenServiceDir /var/lib/tor/hidden_service_fulcrum/ #HiddenServiceVersion 3 #HiddenServicePort 50002 127.0.0.1:50002 # Hidden Service Fulcrum TCP #HiddenServiceDir /var/lib/tor/hidden_service_fulcrum_tcp/ #HiddenServiceVersion 3 #HiddenServicePort 50001 127.0.0.1:50001 -
Reload torrc config
$ sudo systemctl reload tor
Uninstall FW configuration
-
Display the UFW firewall rules and notes the numbers of the rules for Fulcrum (e.g., X and Y below)
$ sudo ufw status numbered > [...] > [X] 50002 ALLOW IN Anywhere # allow Fulcrum SSL > [...] > [X] 50002 (v6) ALLOW IN Anywhere (v6) # allow Fulcrum SSL > [...] > [Y] 50001 ALLOW IN Anywhere # allow Fulcrum TCP > [...] > [Y] 50001 (v6) ALLOW IN Anywhere (v6) # allow Fulcrum TCP -
Delete the rule with the correct number and confirm with “yes”
$ sudo ufw delete X
Uninstall the Zram (optional)
-
Navigate to zram-swap folder and uninstall
$ cd /home/admin/zram-swap $ sudo ./install.sh --uninstall $ sudo rm /etc/default/zram-swap $ sudo rm -rf /home/admin/zram-swap -
Make sure that the change was done
$ sudo cat /proc/swaps -
Expected output:
Filename                                Type                Size           Used    Priority
/var/swap                              file                 102396         0       -2
« Back: + Bitcoin