Bonus guide: Samourai Dojo
Samourai Dojo is the backing server for Samourai Wallet. Provides HD account & loose addresses (BIP47) balances & transactions lists. Provides unspent output lists to the wallet. PushTX endpoint broadcasts transactions through the backing bitcoind node.
Difficulty: Medium
Status: Tested v3

Table of contents
- Requirements
- Preparations
- Installation
- Configuration
- Run Dojo
- Connect to Dojo
- Extras
- For the future: Dojo upgrade
- Uninstall
Requirements
- Minimum RAM: 4 GB
- Bitcoin Core
- Fulcrum (recommended) / Electrs
- Node.js v16+
- Nginx
Preparations
Write down your passwords
Samourai Dojo requires you to generate several new passwords. They should be unique and very secure, at least 12 characters in length. Do not use uncommon special characters, spaces, or quotes (‘ or “). Store a copy of your passwords somewhere safe (preferably in an open-source password manager like KeePassXC) or whatever password manager you’re already using)
  [ F ] MYSQL ROOT PASSWORD
  [ G ] MYSQL PASSWORD
  [ H ] NODE API KEY 1, NODE API KEY 2
  [ I ] NODE ADMIN KEY
  [ J ] NODE JWT SECRET
Install Node.js
Node.js is a back-end JavaScript runtime environment necessary for Samourai Dojo.
-
Ensure that you are logged with user “admin”, check if Node.js is installed on the system
$ node -v
> v16.13.1
Node.js was already installed as a part of Blockchain explorer guide. If not installed, simply follow Install Node.js part in the explorer guide and return back
Install PM2
-
Install PM2 process manager
$ sudo npm i -g pm2
Firewall
-
Configure the UFW firewall to allow incoming HTTPS requests
$ sudo ufw allow 4011/tcp comment 'allow Dojo SSL'
For Electrs
If you are using Electrs instead of Fulcrum, it is necessary to make following change inside Bitcoind configuration file. Fulcrum users can skip this step as it is already done.
-
Open
bitcoin.conf$ sudo nano /data/bitcoin/bitcoin.conf -
Add following line preferably under “#zmq” or at the end of the file
#zmq zmqpubhashblock=tcp://127.0.0.1:8433 -
Restart Bitcoind
$ sudo systemctl restart bitcoind
Installation
Download Samourai Dojo
-
As a user “admin” move to a temporary directory which is cleared on reboot
$ cd /tmp -
Set a temporary version environment variable to the installation
$ VERSION=1.20.0 -
Get the latest download links at code.samourai.io/dojo. They change with each update
$ wget https://code.samourai.io/dojo/samourai-dojo/-/archive/v$VERSION/samourai-dojo-v$VERSION.tar.gz $ wget https://code.samourai.io/dojo/samourai-dojo/uploads/7d1fb4c1dda87dc77b66e7311caeffc3/samourai-dojo-v1.20.0-fingerprints.txt $ wget https://code.samourai.io/dojo/samourai-dojo/uploads/59b9682aa5e1d6f8d5306572560d79be/samourai-dojo-v1.20.0-fingerprints.txt.sig -
Calculate the checksum of the binary you’ve downloaded and compare it to the one provided in the fingerprints text file
$ sha256sum --ignore-missing --check samourai-dojo-v$VERSION-fingerprints.txt > samourai-dojo-v1.20.0.tar.gz: OK -
Import the GPG public key of the developer that signed the fingerprints file
$ curl https://keys.openpgp.org/vks/v1/by-fingerprint/377DE507FDC47F020099E342CFA54E4C0CD58DF0 | gpg --import -
Verify that the fingerprints file has actually been signed by that developer
$ gpg --verify samourai-dojo-v$VERSION-fingerprints.txt.sig> gpg: assuming signed data in 'samourai-dojo-v1.20.0-fingerprints.txt' > gpg: Signature made Wed Mar 22 20:08:20 2023 UTC > gpg: using RSA key 377DE507FDC47F020099E342CFA54E4C0CD58DF0 > gpg: Good signature from "pavel.sevcik@protonmail.com <pavel.sevcik@protonmail.com>" [unknown] [...] -
If the signature checks out, unpack the binary
$ tar -xvf samourai-dojo-v$VERSION.tar.gz
MariaDB
MariaDB is an open source relational database. If MariaDB is already installed, skip the installation section.
-
With user “admin”, update the
aptpackages index and install MariaDB$ sudo apt install mariadb-server -
Run the secure installation
$ sudo mysql_secure_installation -
Enter the following answers in the shell and exit. Change “[ F ] MYSQL ROOT PASSWORD” to your password.
Enter current password for root (enter for none): [ F ] MYSQL ROOT PASSWORD Switch to unix_socket authentication [Y/n]: n Change the root password? [Y/n]: n Remove anonymous users? [Y/n]: Y Disallow root login remotely? [Y/n]: Y Remove test database and access to it? [Y/n]: Y Reload privilege tables now? [Y/n] Y -
Now, open the MariaDB shell
$ sudo mysql> Welcome to the MariaDB monitor. Commands end with ; or \g. > [...] MariaDB [(none)]> -
The instructions to enter in the MariaDB shell start after “MariaDB [(none)]>”. Enter each command one by one including “;”. You only change “[ G ] MYSQL_PASSWORD” to your corresponding password (must stay inside single quotes ‘password’)
MariaDB [(none)]> CREATE DATABASE dojo_db; > Query OK, 1 row affected (0.001 sec) MariaDB [(none)]> CREATE USER 'dojo'@'localhost' IDENTIFIED BY '[ G ] MYSQL PASSWORD'; > Query OK, 0 rows affected (0.005 sec) MariaDB [(none)]> GRANT ALL PRIVILEGES ON dojo_db.* TO 'dojo'@'localhost'; > Query OK, 0 rows affected (0.006 sec) MariaDB [(none)]> FLUSH PRIVILEGES; > Query OK, 0 rows affected (0.001 sec) -
Exit MySQL shell
MariaDB [(none)]> exit
Create the dojo user and data directory
-
Create the user “dojo” and add him to the group “bitcoin” as well
$ sudo adduser --disabled-password --gecos "" dojo $ sudo adduser dojo bitcoin -
Create the Dojo data directory and move Dojo
$ sudo mkdir -p /opt/dojo/ $ sudo mv /tmp/samourai-dojo-v$VERSION/* /opt/dojo/ $ sudo chown -R dojo:dojo /opt/dojo/ -
Create a symlink to /home/dojo/.dojo
$ sudo ln -s /opt/dojo /home/dojo/.dojo $ sudo chown -R dojo:dojo /home/dojo/.dojo -
Switch to user “dojo”
$ sudo su - dojo -
Display the link and check that it is not shown in red (this would indicate an error)
$ ls -la
Configuration
index.js
-
With user “dojo” move to “conf” directory. Rename
index-mainnet.jstoindex.js$ cd /opt/dojo/static/admin/conf $ mv index-mainnet.js index.js -
With user “dojo” move to “keys” directory. Rename index-example.js to index.js
$ cd /opt/dojo/keys $ mv index-example.js index.js -
As user “dojo” open “index.js”
$ nano index.js
We will edit 6 parts of this file - bitcoind, database (db), ports, API auth, jwt and indexer. Change following values for each part of the file. Values have to be inside single quotes 'abc' when shown, use your corresponding password instead of “[ X ] PASSWORD”
-
Find and edit these lines inside “bitcoind” part to following values
bitcoind: { [...] // Login user: 'raspibolt', // Password pass: '[ B ] Bitcoin RPC password', [...] // ZMQ Tx notifications zmqTx: 'tcp://127.0.0.1:28333', // ZMQ Block notifications zmqBlk: 'tcp://127.0.0.1:8433', -
Find and edit these lines inside “db” part to following values
db: { [...] // User user: 'dojo', // Password pass: '[ G ] MYSQL PASSWORD', [...] // Db name database: 'dojo_db', -
Find and edit these lines inside “auth” configuration to following values.
auth: { [...] // List of API keys (alphanumeric characters) apiKeys: ['[ H ] NODE API KEY 1','[ H ] NODE API KEY 2'], // Admin key (alphanumeric characters) adminKey: '[ I ] NODE ADMIN KEY', -
Comment Auth47 (paynym) login option using
//including “}” right below “paymentCodes” as shown below (4 lines). Dojo Maintanence Tool is not working properly if these values are empty and not commented! -
If you want to set up Auth47 login option, please comment these lines anyway and uncomment them in later steps. Dojo would not start properly and Tor service is not set up yet
//auth47: { # All of these four lines must be commented with "//" at the beginning as shown //hostname: '<dojoHostname>', //paymentCodes: ['<myPaymentCode>'] //} -
Find and edit these lines inside “jwt” configuration to following values
jwt: { [...] // Secret passphrase used by the server to sign the jwt // (alphanumeric characters) secret: '[ J ] NODE JWT SECRET', -
Find and edit these lines inside “indexer” configuration to following values. Use port “50001” and “tcp” for Electrs
* Indexer or third party service [...] // Values: local_bitcoind | local_indexer | third_party_explorer active: 'local_indexer', // Port port: 50002, // Protocol for communication (TCP or TLS) protocol: 'tls' -
Save and exit
pm2.config
-
Still as user “dojo”, move to the dojo directory, rename pm2 config file and open it
$ cd /opt/dojo $ mv pm2.config.cjs.example pm2.config.cjs $ nano pm2.config.cjs -
Change “INTERPRETER” value to “node” (at the beginning). Save and exit
[...] const INTERPRETER = 'node' // OR binary name like `node` -
Exit “dojo” user session
$ exit
pm2.config syntax error (skip)
-
If during Dojo startup following error gets displayed, it is necessary to make following changes to the “pm2.config.cjs”
[PM2][ERROR] File pm2.config.cjs malformated npm WARN deprecatedconst path = require('path') -
With user “dojo” rename “pm2.config.cjs” to “pm2.config.cjs.bak”, create a new file and paste following content
$ mv /opt/dojo/pm2.config.cjs /opt/dojo/pm2.config.cjs.bak
$ nano pm2.config.cjs
const path = require('path'); // Added this line to import the `path` module const NAMESPACE = 'mainnet' // OR testnet const INTERPRETER = 'node' // OR binary name like `node` module.exports = { apps: [ { name: `Samourai Dojo - Accounts (${NAMESPACE})`, namespace: NAMESPACE, script: './index.js', cwd: path.join(__dirname, 'accounts'), // Modified this line to use `path.join` instead of `./accounts` interpreter: INTERPRETER, out_file: './output-2022-01-01.log', error_file: './error-2022-01-01.log', wait_ready: true, stop_exit_codes: 0, listen_timeout: 5000, kill_timeout: 3000, }, { name: `Samourai Dojo - PushTX (${NAMESPACE})`, namespace: NAMESPACE, script: './index.js', cwd: path.join(__dirname, 'pushtx'), // Modified this line to use `path.join` instead of `./pushtx` interpreter: INTERPRETER, out_file: './output-2022-01-01.log', error_file: './error-2022-01-01.log', wait_ready: true, stop_exit_codes: 0, listen_timeout: 5000, kill_timeout: 3000, }, { name: `Samourai Dojo - PushTX orhestrator (${NAMESPACE})`, namespace: NAMESPACE, script: './index-orchestrator.js', cwd: path.join(__dirname, 'pushtx'), // Modified this line to use `path.join` instead of `./pushtx` interpreter: INTERPRETER, out_file: './output-orchestrator-2022-01-01.log', error_file: './error-orchestrator-2022-01-01.log', wait_ready: true, stop_exit_codes: 0, listen_timeout: 5000, kill_timeout: 3000, }, { name: `Samourai Dojo - Tracker (${NAMESPACE})`, namespace: NAMESPACE, script: './index.js', cwd: path.join(__dirname, 'tracker'), // Modified this line to use `path.join` instead of `./tracker` interpreter: INTERPRETER, out_file: './output-2022-01-01.log', error_file: './error-2022-01-01.log', wait_ready: true, stop_exit_codes: 0, listen_timeout: 5000, kill_timeout: 3000, } ] }; -
Save and exit. Start Dojo again
Restrict access to configuration file
The Dojo configuration file contains the Bitcoin Core RPC username and password which are sensitive information. We’ll restrict reading access to this file by user “dojo” only.
-
With user “admin”, change the ownership of the configuration file
$ sudo chmod 600 /opt/dojo/keys/index.js
Dependencies
-
With user “admin”, install necessary dependencies while inside the Dojo folder.
$ cd /opt/dojo/ $ sudo npm install --omit=dev -
Import Dojo scripts to the MariaDB database. Change “[ F ] MYSQL_ROOT_PASSWORD” to your password (must stay inside quotes: “password”)
$ sudo mysql -u"root" -p"[ F ] MYSQL_ROOT_PASSWORD" "dojo_db" < ./db-scripts/1_db.sql.tpl -v-------------- > /*!40101 SET @OLD_CHARACTER_SET_CLIENT=@@CHARACTER_SET_CLIENT */ -------------- > [...]
Tor Hidden Service
Tor is used to access “Dojo API and Maintanence tool” and to reach Dojo in an anonymous way.
-
Edit “torrc” file
$ sudo nano /etc/tor/torrc -
Paste following values at the end of your
torrcfile############### This section is just for location-hidden services ### # Hidden Service Dojo HiddenServiceDir /var/lib/tor/hidden_service_dojo/ HiddenServiceVersion 3 HiddenServicePort 80 127.0.0.1:4010 -
Restart Tor
$ sudo systemctl reload tor -
Print hostname and write it down to a safe place
$ sudo cat /var/lib/tor/hidden_service_dojo/hostname
> xyz.onion
Nginx Reverse Proxy
Configure nginx.conf for Dojo Maintanence Tool.
-
Replace the main nginx configuration file
$ sudo mv /etc/nginx/nginx.conf /etc/nginx/raspibolt-nginx.conf.bak $ sudo nano /etc/nginx/nginx.conf -
Add following block lines inside your nginx.conf file. Configuration is mempool and homer compatible.
user www-data; worker_processes 1; pid /run/nginx.pid; include /etc/nginx/modules-enabled/*.conf; events { worker_connections 768; } stream { ssl_certificate /etc/ssl/certs/nginx-selfsigned.crt; ssl_certificate_key /etc/ssl/private/nginx-selfsigned.key; ssl_session_cache shared:SSL:1m; ssl_session_timeout 4h; ssl_protocols TLSv1.2 TLSv1.3; ssl_prefer_server_ciphers on; include /etc/nginx/streams-enabled/*.conf; } # RaspiBolt: Dojo / Mempool / Homer http configuration # /etc/nginx/nginx.conf http { include /etc/nginx/mime.types; default_type application/octet-stream; server_names_hash_bucket_size 128; # Disable activity logging for privacy. access_log off; # Do not reveal the version of server server_tokens off; sendfile on; keepalive_timeout 95; # Enable response compression gzip on; # Compression level: 1-9 gzip_comp_level 1; # Disable gzip compression for older IE gzip_disable msie6; # Minimum length of response before gzip kicks in gzip_min_length 128; # Compress these MIME types in addition to text/html gzip_types application/json; # Help with proxying by adding the Vary: Accept-Encoding response gzip_vary on; include /etc/nginx/sites-enabled/*.conf; } -
Create a new file called
dojo.confinside “sites-enabled” directory$ sudo nano /etc/nginx/sites-enabled/dojo.conf -
Paste following values and change “xyz.onion” under the “Tor Site Configuration” to your Tor hostname address
# RaspiBolt: Dojo configuration # /etc/nginx/sites-enabled/dojo.conf # https://code.samourai.io/dojo/samourai-dojo/-/blob/develop/docker/my-dojo/nginx/mainnet.conf map $http_upgrade $connection_upgrade { default upgrade; '' close; } # WebSocket server listening here upstream websocket { server localhost:8080; } # Tor Site Configuration server { listen 4011 ssl; listen 4010; server_name xyz.onion; port_in_redirect off; server_tokens off; # Set proxy timeouts for the application proxy_connect_timeout 600; proxy_read_timeout 600; proxy_send_timeout 600; send_timeout 600; # Raspibolt Certificates ssl_certificate /etc/ssl/certs/nginx-selfsigned.crt; ssl_certificate_key /etc/ssl/private/nginx-selfsigned.key; # Proxy WebSocket connections first location /v2/inv { proxy_pass http://websocket; proxy_http_version 1.1; proxy_set_header Upgrade $http_upgrade; proxy_set_header Connection $connection_upgrade; } # PushTX server is separate, so proxy first location /v2/pushtx/ { proxy_pass http://localhost:8081/; } # Tracker server is separate, so proxy first location /v2/tracker/ { proxy_pass http://localhost:8082/; } # Proxy requests to maintenance tool location /admin/ { proxy_pass http://localhost:8080/static/admin/; } # Proxy all other v2 requests to the accounts server location /v2/ { proxy_pass http://localhost:8080/; } # Redirect onion address to maintenance tool location = / { return 301 /admin; } } -
Test and restart nginx configuration
$ sudo nginx -t> nginx: the configuration file /etc/nginx/nginx.conf syntax is ok > nginx: configuration file /etc/nginx/nginx.conf test is successful$ sudo systemctl reload nginx
Run Dojo
-
Switch to user “dojo”
$ sudo su - dojo -
Start Dojo
$ cd /opt/dojo
$ pm2 start pm2.config.cjs
┌────┬────────────────────┬──────────┬──────┬───────────┬──────────┬──────────┐ │ id │ name │ mode │ ↺ │ status │ cpu │ memory │ ├────┼────────────────────┼──────────┼──────┼───────────┼──────────┼──────────┤ │ 0 │ Samourai Dojo - A… │ fork │ 1 │ online │ 0% │ 115.5mb │ │ 1 │ Samourai Dojo - P… │ fork │ 1 │ online │ 0% │ 71.9mb │ │ 2 │ Samourai Dojo - P… │ fork │ 1 │ online │ 0% │ 74.1mb │ │ 3 │ Samourai Dojo - T… │ fork │ 1 │ online │ 0% │ 184.8mb │ └────┴────────────────────┴──────────┴──────┴───────────┴──────────┴──────────┘
If following error gets diplayed: “[PM2][ERROR] File pm2.config.cjs malformated”, follow this section and return back for the rest of installation
-
Check the logs, you should expect following output (it will take a while for blocks to synchronise):
$ pm2 logs mainnet3|Samourai | Ignoring invalid configuration option passed to Connection: acquireTimeout. This is currently a warning, but in future versions of MySQL2, an error will be thrown if you pass an invalid configuration option to a Connection 7|Samourai | 2022-09-26T16:26:08Z INFO Tracker : Added block header 409 (id=409) 7|Samourai | 2022-09-26T16:26:08Z INFO Tracker : Beginning to process new block header. 7|Samourai Dojo - Tracker (mainnet) | 2022-09-26T16:26:10Z INFO Tracker : Added block header 410 (id=410) 7|Samourai Dojo - Tracker (mainnet) | 2022-09-26T16:26:10Z INFO Tracker : Beginning to process new block header. -
Once finished, following output is expected
7|Samourai Dojo - Tracker (mainnet) | 2022-09-26T19:13:15Z INFO Tracker : Processing active Mempool (7 transactions) 7|Samourai Dojo - Tracker (mainnet) | 2022-09-26T19:13:17Z INFO Tracker : Processing active Mempool (2 transactions) 7|Samourai Dojo - Tracker (mainnet) | 2022-09-26T19:13:19Z INFO Tracker : Processing active Mempool (8 transactions) -
To view Dojo status use following command
$ pm2 status mainnet┌────┬────────────────────┬──────────┬──────┬───────────┬──────────┬──────────┐ │ id │ name │ mode │ ↺ │ status │ cpu │ memory │ ├────┼────────────────────┼──────────┼──────┼───────────┼──────────┼──────────┤ │ 0 │ Samourai Dojo - A… │ fork │ 1 │ online │ 0% │ 115.5mb │ │ 1 │ Samourai Dojo - P… │ fork │ 1 │ online │ 0% │ 71.9mb │ │ 2 │ Samourai Dojo - P… │ fork │ 1 │ online │ 0% │ 74.1mb │ │ 3 │ Samourai Dojo - T… │ fork │ 1 │ online │ 0% │ 184.8mb │ └────┴────────────────────┴──────────┴──────┴───────────┴──────────┴──────────┘ -
View specific logs using following command
$ pm2 logs <id>
Autostart on boot
Now we’ll make sure Dojo starts as a service on the Raspberry Pi so it’s always running.
-
Still logged as a “dojo” user, save running processes with following command
$ pm2 save -
Run these processes at reboot automatically. Copy entire generated output starting with “sudo”
$ pm2 startup> [PM2] Init System found: systemd > [PM2] To setup the Startup Script, copy/paste the following command: > sudo env PATH=$PATH:/usr/local/bin /usr/local/lib/node_modules/pm2/bin/pm2 startup systemd -u dojo --hp /home/dojo -
Exit “dojo” user session
$ exit -
Paste your own output into the CLI as user “admin”, who has sudo privileges
$ sudo env PATH=$PATH:/usr/local/bin /usr/local/lib/node_modules/pm2/bin/pm2 startup systemd -u dojo --hp /home/dojo> [ 'systemctl enable pm2-dojo' ] > [PM2] Writing init configuration in /etc/systemd/system/pm2-dojo.service > [PM2] Making script booting at startup... > [PM2] [-] Executing: systemctl enable pm2-dojo... > Created symlink /etc/systemd/system/multi-user.target.wants/pm2-dojo.service -> /etc/systemd/system/pm2-dojo.service. > [PM2] [v] Command successfully executed.
Connect to Dojo
Erase Samourai Wallet
To connect, you need to delete and restore already existing Samourai Wallet. Backend configuration can only be modified at the start of wallet creation/restore process. Following steps are recommended!
Check Mnemonic Phrase
- Navigate to the settings by tapping
⋮on the top right of the Samourai toolbar and then tappingSettings - Once in the settings screen tap on
Walletand thenShow Mnemonic - Check if Mnemonic phrase is correct
Check Passphrase
- Move back to
Settingsand then tapTroubleshoot - Tap
Passphrase testto begin the test - You will be asked to enter your passphrase. Upon success you will be notified
Erase Wallet
- In
SettingstapWallet - At the bottom of this screen, tap
Secure erase wallet
Find Pairing Code
Connect samourai wallet to your own backend
-
If on local network, point your browser to the secure access point provided by the nginx web proxy, for example https://raspibolt.local:4011 (or your nodes IP address, e.g. https://192.168.0.20:4011).
-
If using Tor, paste your hostname generated in Tor Hidden Service section into Tor browser with following syntax:
http://xyz.onion. You can bookmark this page for easier future access -
Authenticate with
[I] NODE ADMIN KEYor with Auth47 (Paynym)

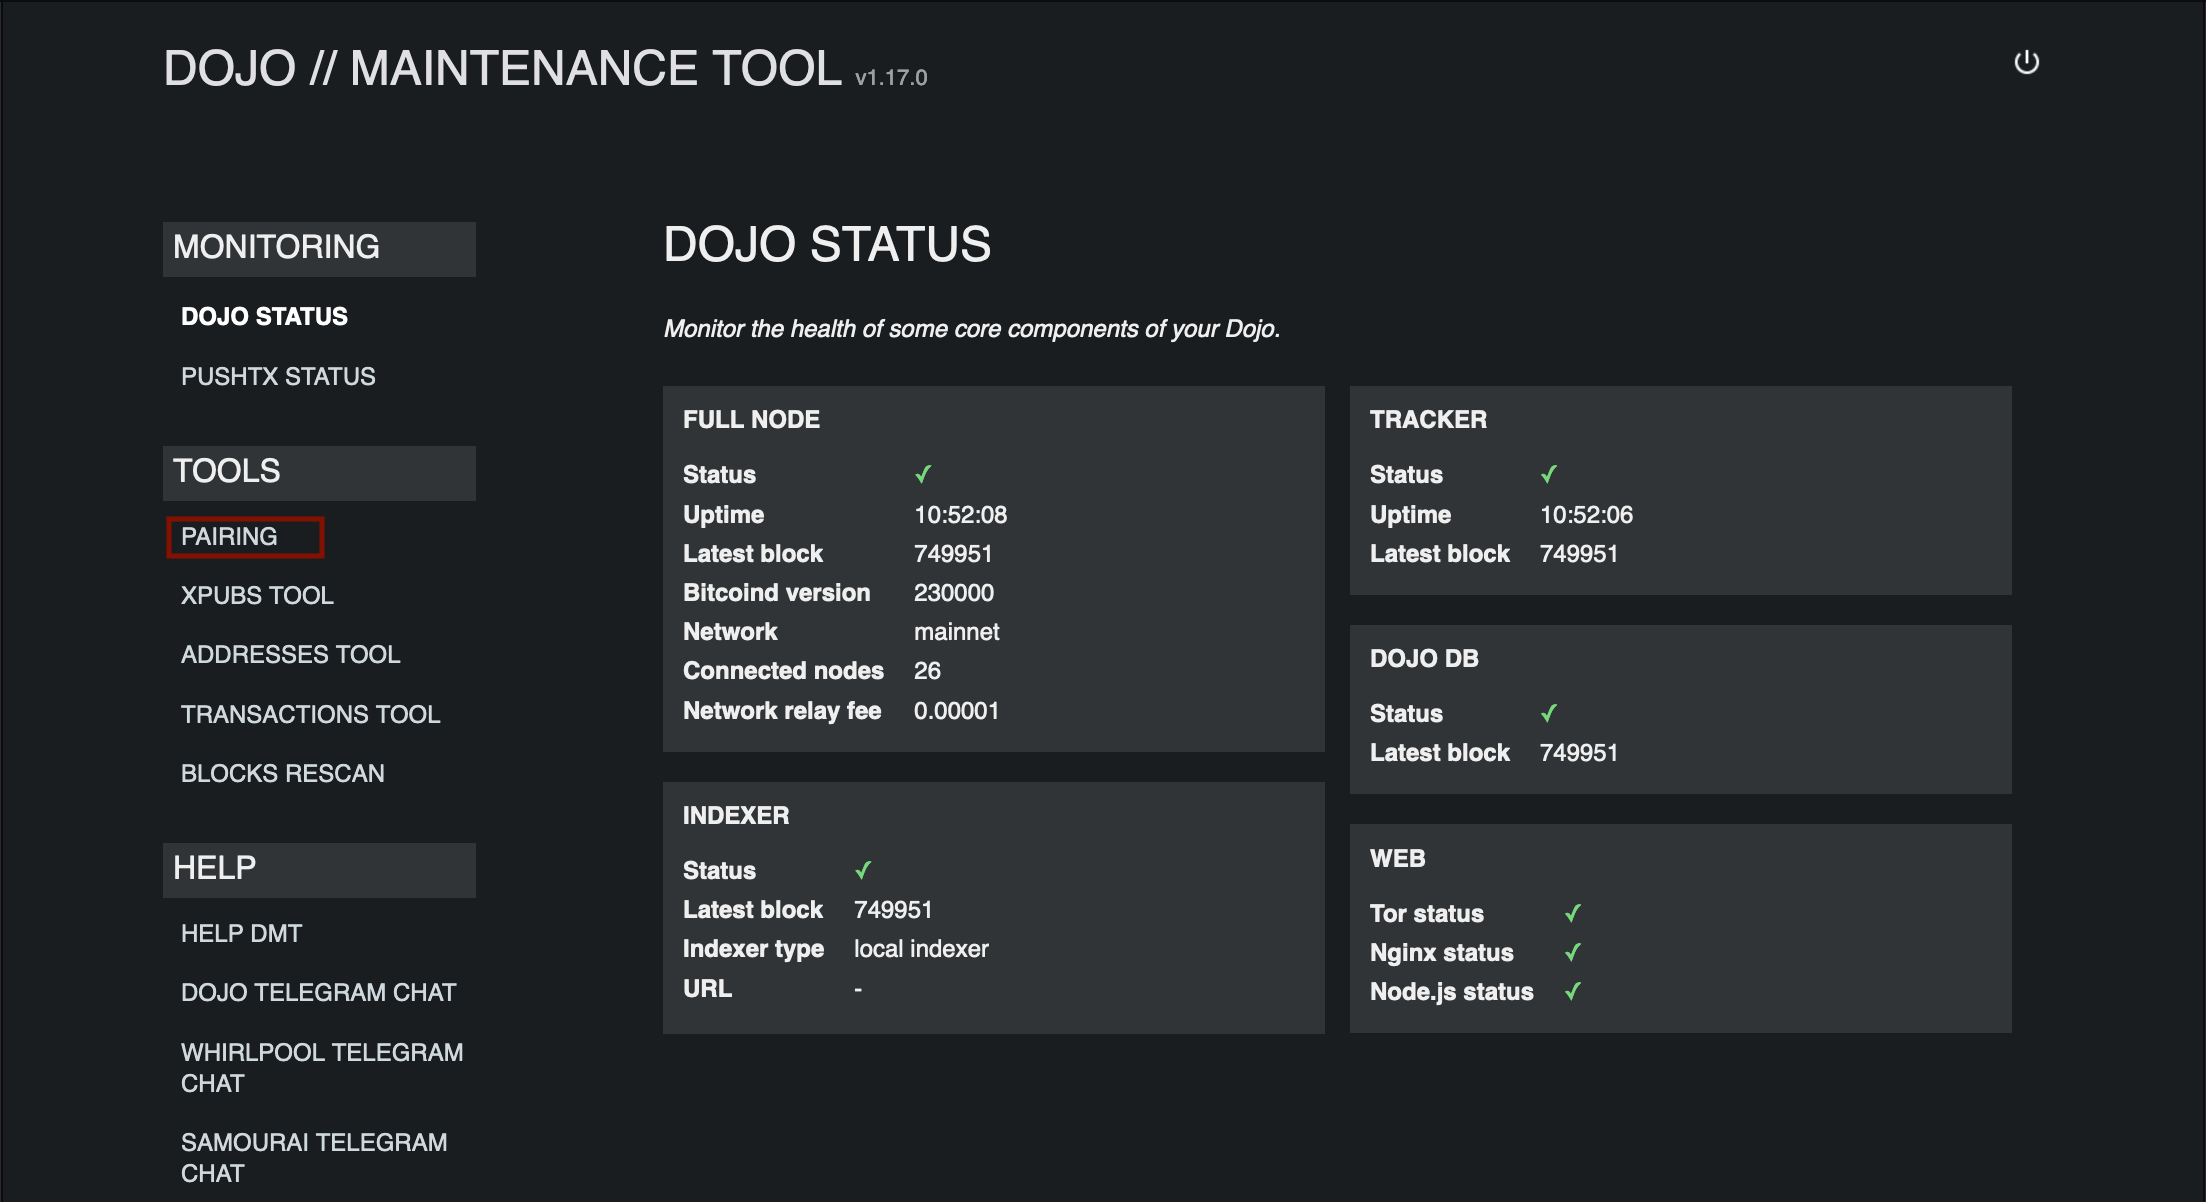
- You will find your QR code for samourai wallet under the
pairing section.
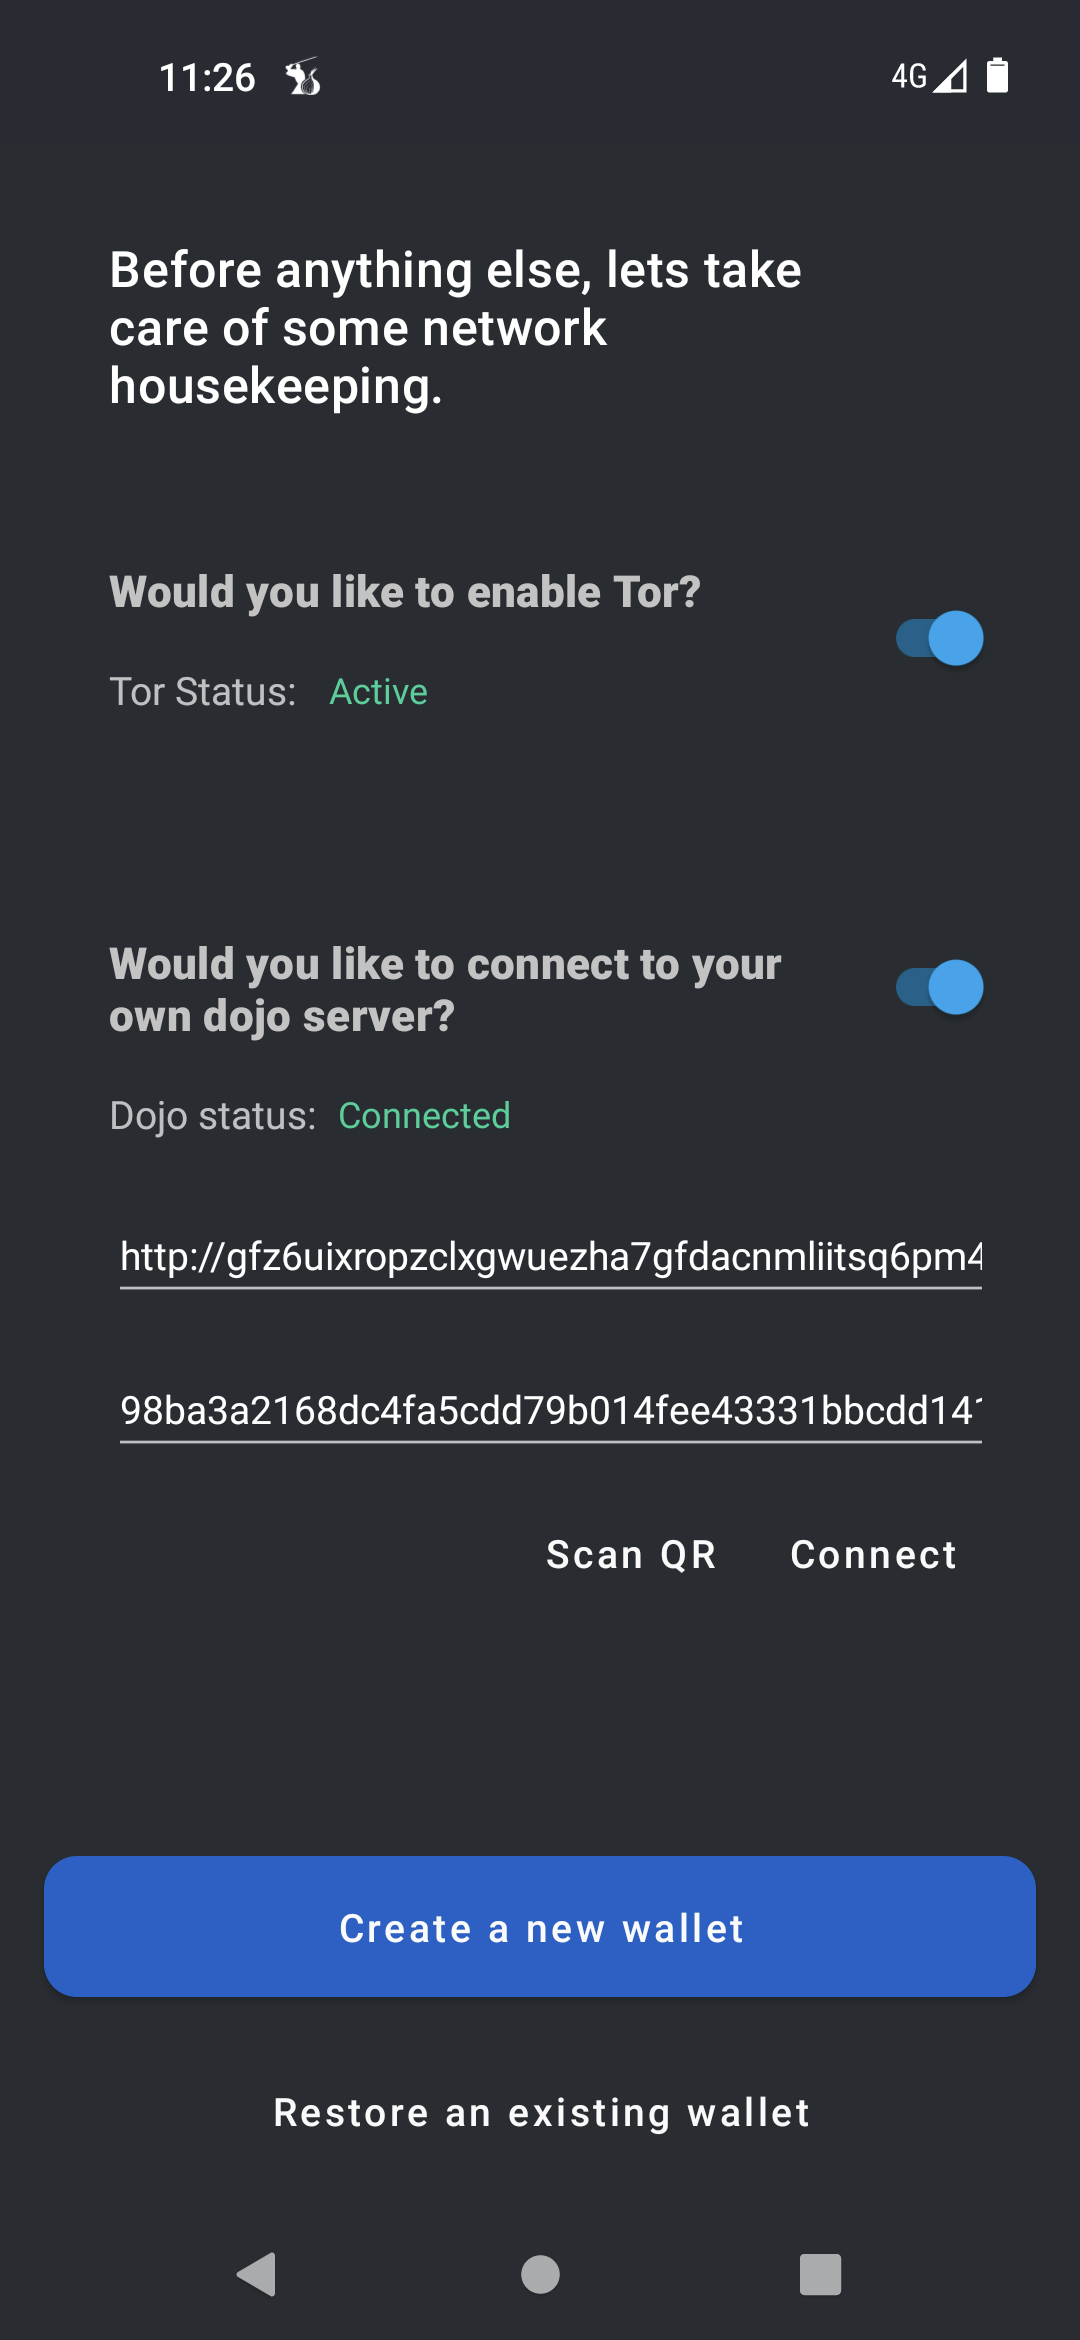
Connect Samourai Wallet
- From the Samourai Wallet start screen, select mainnet and activate Tor
-
Toggle the Dojo button on to connect to your own Dojo server
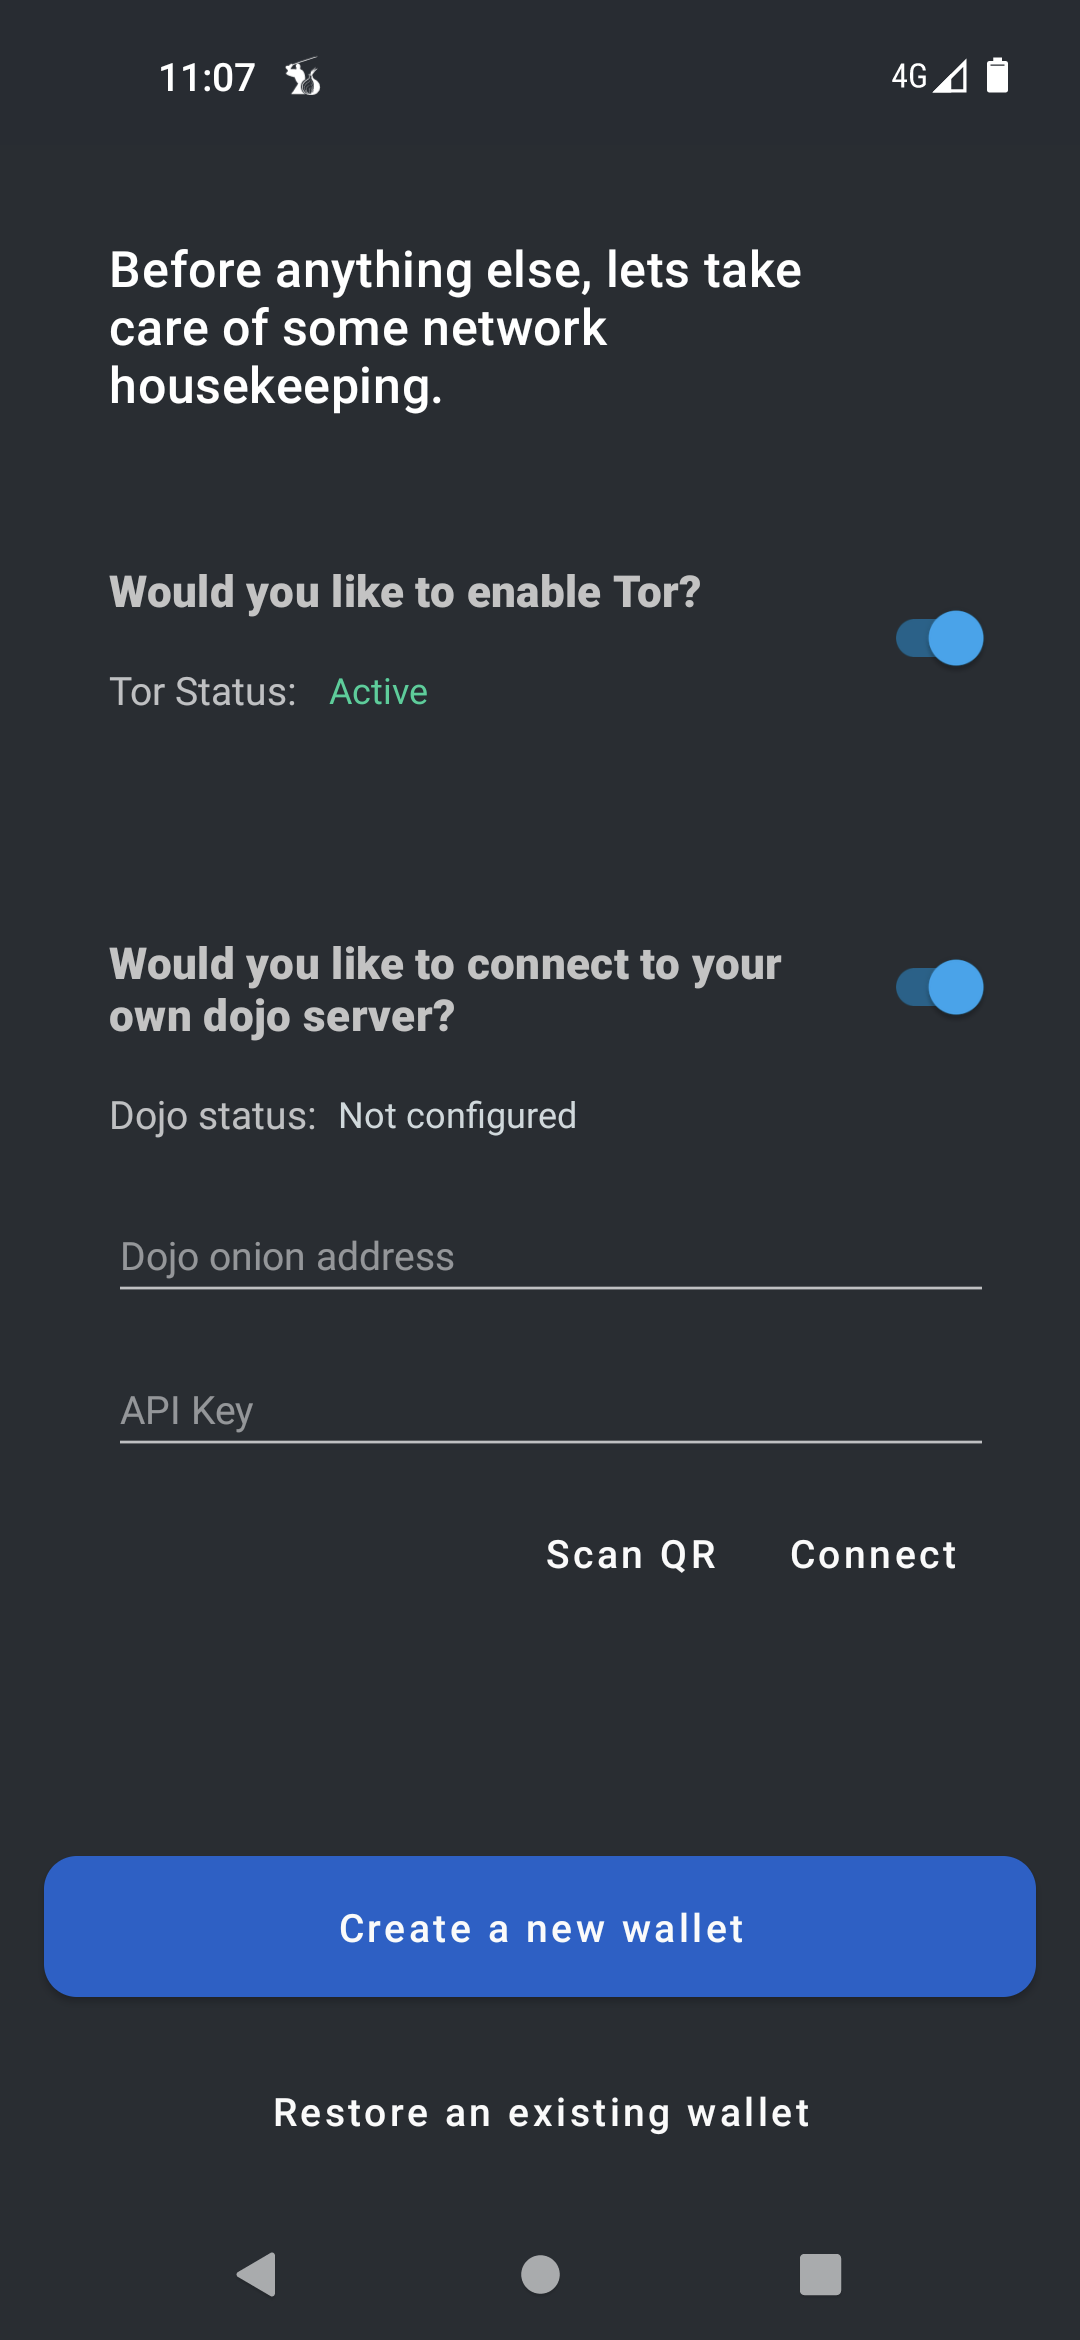
- Scan the pairing QR code displayed by your chosen Dojo implementation
💡 If you are not pairing from the Tor Browser, the Dojo Tor address will not be filled in. In that case, either use the Tor Browser for pairing or fill in the input field in the following format: http://xyz.onion/v2
-
Tap Restore an existing wallet
Extras
Rescan public keys using Dojo Maintenance Tool
If no balance is shown in your samourai wallet, it is necessary to rescan public keys as they are not tracked by Dojo yet.
- Log into
Dojo API and Maintenance Toolusing Tor browser - Move to
xpubs tool, underToolssection - In samourai wallet go to
Settings > Wallet, here you can find your public keys - Copy and paste all “zpubs” into
xpub tooland rescan each public key separately
Samourai wallet uses zpubs by default, however if you use other address format than “bc”, it is necessary to rescan other pubs as well
Use Auth47 (Paynym) login for Dojo Maintanence Tool
-
Open “index.js” configuration file
$ sudo nano /opt/dojo/keys/index.js -
Uncomment these 4 lines including “}” we commeneted during configuration part of installation. Paste your tor hostname in the shown format and your payment code
auth47: { hostname: 'http://xyz.onion', paymentCodes: ['PM8T...'] } -
Restart Samourai Dojo
$ sudo systemctl restart pm2-dojo.service -
Open Dojo Maintanence Tool
-
In Samourai Wallet go to
Tools>Authenticate using paynym -
Scan the login QR code with your phone
-
If successful, you will be logged in
For the future: Dojo upgrade
-
Upgrade packages
$ sudo apt update $ sudo apt full-upgrade -
Upgrade node package manager if available
$ sudo npm install latest-version > added x packages, and audited x packages in x seconds -
Stop Samourai Dojo
$ sudo systemctl stop pm2-dojo.service - Following the Installation section, download latest Dojo version inside
/tmpdirectory, verify release and unpack Dojo file. Then return back to Upgrade section to continue -
Once done, we need to move and overwrite several files, so we will use “rsync -a” command instead of “mv”. Make sure to replace several “x” in “samourai-dojo-vx.xx.x” command with current version
$ sudo rsync -a /tmp/samourai-dojo-v$VERSION/* /opt/dojo/ -
Go to
keysdirectory, openindex.js$ cd /opt/dojo/keys $ sudo nano index.js -
Edit Dojo version to the latest one installed by replacing several “x” with current version. Save and exit.
bitcoin: { /* * Dojo version */ dojoVersion: 'x.xx.x', # Edit to Dojo version -
While in
/opt/dojo, install latest dependencies$ cd /opt/dojo $ sudo npm install --omit=dev -
Run Dojo and check Dojo Maintanence Tool if you run correct version
$ sudo systemctl start pm2-dojo.service
Uninstall
Uninstall Dojo
-
As user “admin”, stop and remove Dojo service
$ sudo systemctl stop pm2-dojo.service $ sudo systemctl disable pm2-dojo.service $ sudo rm /etc/systemd/system/pm2-dojo.service -
Remove Dojo directory and Dojo user
$ sudo rm -R /opt/dojo
$ sudo userdel -r dojo
Remove Tor Hidden Service
-
Remove Tor configuration. Comment or delete following lines
$ sudo nano /etc/tor/torrc############### This section is just for location-hidden services ### # Hidden Service Dojo #HiddenServiceDir /var/lib/tor/hidden_service_dojo/ #HiddenServiceVersion 3 #HiddenServicePort 80 127.0.0.1:4010$ sudo systemctl reload tor
Remove Nginx configuration
-
Remove Nginx configuration for Dojo
$ sudo rm /etc/nginx/sites-enabled/dojo.conf
$ sudo systemctl reload nginx
Remove MariaDB
-
Remove MariaDB
$ sudo service mysql stop
$ sudo apt-get --purge remove "mysql*"
« Back: + Bitcoin